Wed, Dec 31, 2025
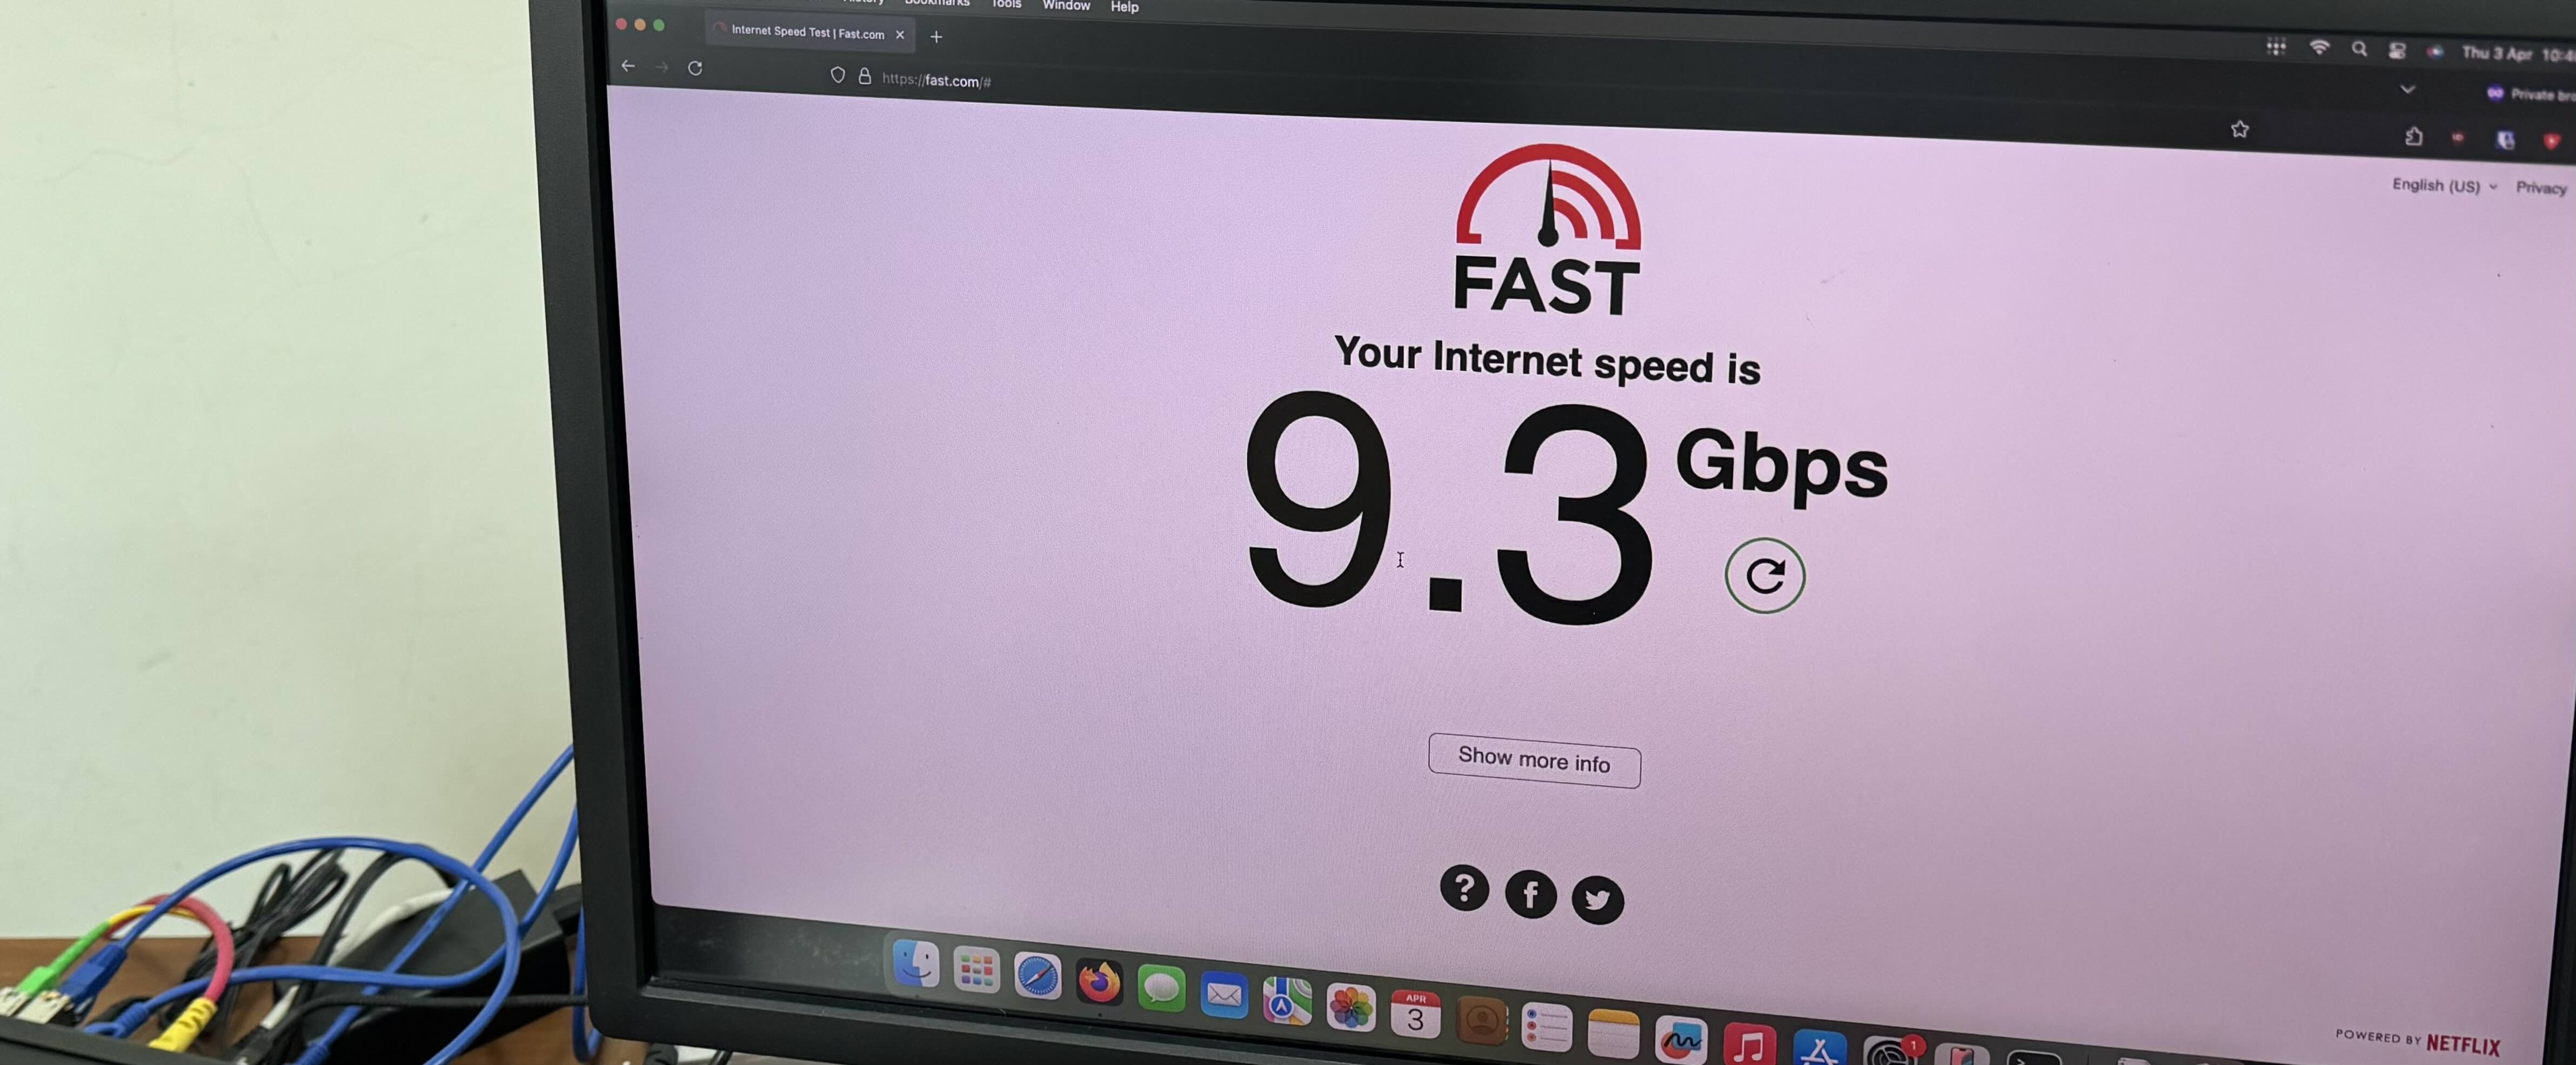
I still find it unreal that 10Gbps internet access at a reasonable rate is a thing, but here we are!
It’s been a year since I switched up to a 10Gbps broadband line from ViewQwest (“VQ”). They’re not bad, but have some unironed wrinkles. Here’s my experience with them.
In brief
For most folks:
- VQ prices are reasonable, but intentionally misleading
- For day to day use, their service works, and the uptime is fine
- They will pick up your support calls quickly, but they typically can’t handle technical questions
- You will need to unsubscribe from their garbage add-ons, but it’s not as egregious as, say, SingTel. (Friends don’t let friends sign up for SingTel)
- They will hand you an ONU device that you must return in order to terminate the service
- Apparently their exit process can be difficult [1], though I am not sure how that compares with other ISPs
For technical folks:
- VQ is the only provider here that officially supports a SFP module
- IPv6 is finally available! They’ll provide a static /56 on request, for free
- Even without applying for a static IPv4 address, they’ll provide a proper, non-CGNAT IPv4 address
Tue, Aug 12, 2025

I recently bought this “Yinren R108” keyboard off Taobao and there’s a lot to like about it. It’s a simple 108-key keyboard with preinstalled hot-swappable Peach V3 switches, and is well priced at about S$88 (~US$70).
It doesn’t come with any vendor branding, has legends on the side of its PBT keycaps, and uses USB-C. The switches sit on a steel plate so the keyboard has some heft and is sturdy. It even has a detachable top cover that is neatly held on by magnets.
However this keyboard has a quirk where it does this tacky gamer RGB-LED rainbow animation for several seconds whenever it is powered on. Sure, it’s cheap, but it doesn’t have to scream that part out loud. Also, there’s no way to turn it off.
Thu, Jan 9, 2025
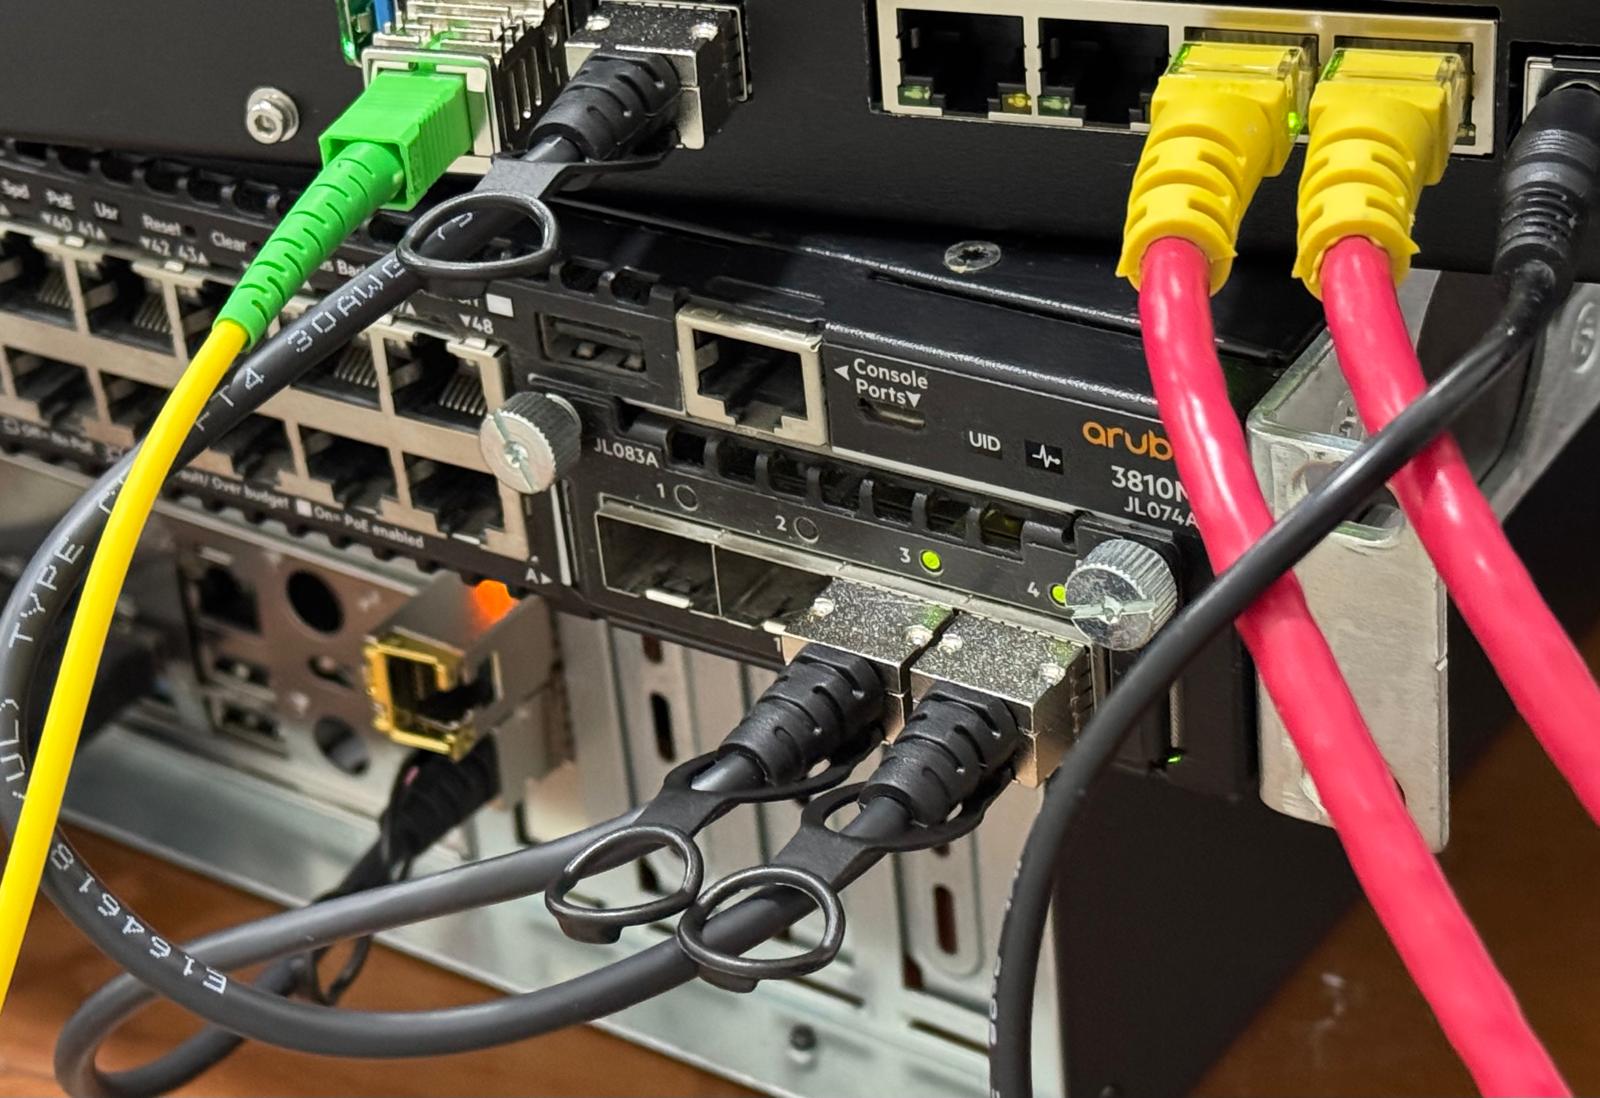
Aruba 3810M, connected with two direct-attach cables. Both port status LEDs are green.
SFP+ transceivers that claimed to be HPE Aruba compatible were getting rejected by my 3810M switch because of their proprietary authentication system, even when it is supposed to be disabled. I found a hack that made them work again by patching a byte in the transceiver EEPROM.
Straight to the point:
- Configure the switch
- Log into the console, enter configuration mode:
config
- Disable HPIDv2 enforcement:
allow-unsupported-transceiver confirm
- Make this change persistent:
write memory
- Configure the transceivers
- Plug the transceiver into the switch. It should now work.
Fri, Oct 2, 2020
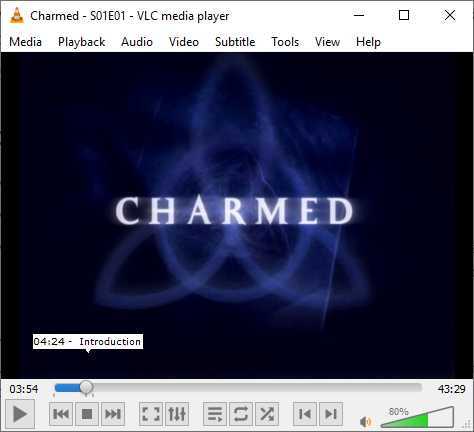
Ever had the problem where you are watching a series, and had to skip past the intro of episode way too many times? Usually I would drag the video scrubber forwards, wiggle it a bit until it settles at the perfect spot. Surely there has to be a better way to do this!
Fri, Sep 18, 2020
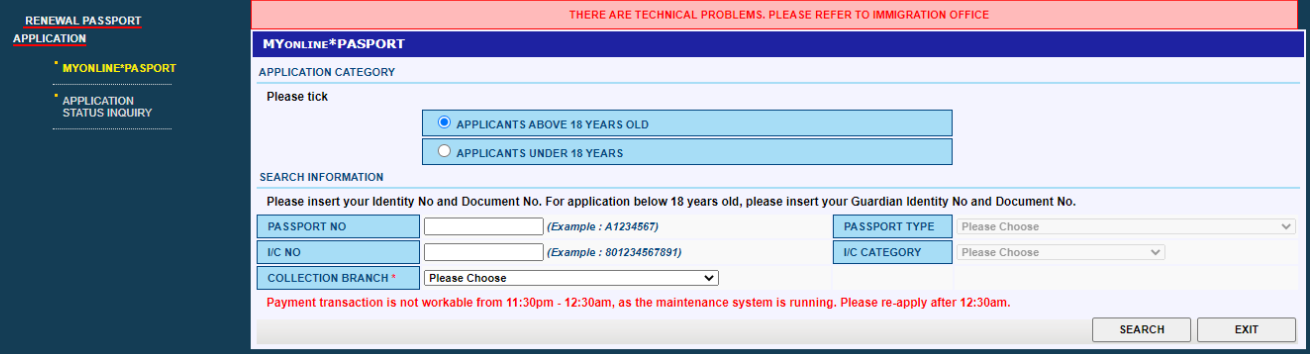
Due to the current pandemic, passport renewal arrangements are trickier; The Malaysian High Commission here no longer accepts walk-in passport renewals, and requires applicants to use the web system.
Here are some workarounds for some technical hurdles that I encountered while helping a Malaysian (working in Singapore) to complete her passport renewal.
When asking for advice, some MY folks here suggested using an agent but warned that they can be predatory. Agencies ultimately have to use the same system as everyone else, so I believed that it would be best to figure out the system, document a successful procedure and hopefully help another Malaysian that may encounter the same issues. .
Disclaimer
I am unrelated to Jabatan Imigresen Malaysia and cannot offer any more help or information outside of this page. I found the Malaysian High Commission Singapore’s facebook page has a lot of discussion and may be a good place to ask the community for advice.
This page will eventually be outdated. Please check the post’s date if the process appears to be different.
Requirements to complete an online application
- Current “old” passport (for passport number and I/C number)
- Phone number (Required field in the application)
- Email (To communicate with the Malaysian High Commission Singapore; also a required field in the application)
- Malaysian bank account that can complete FPX transactions, with at least RM200. Credit/debit cards are no longer available as an option.
Mon, Apr 27, 2020
Please note: some GIF images will flash briefly.

I programmed this Gameboy (cartridge) to control my air-conditioner!
Last year, I was lucky enough to be gifted a Gameboy Color in great shape. Apart from its intended gameplay features, I also wanted to try and build something meaningful with it, so I made this application to control my air-conditioner over its existing, reverse-engineered infrared protocol.
Thu, Sep 20, 2018
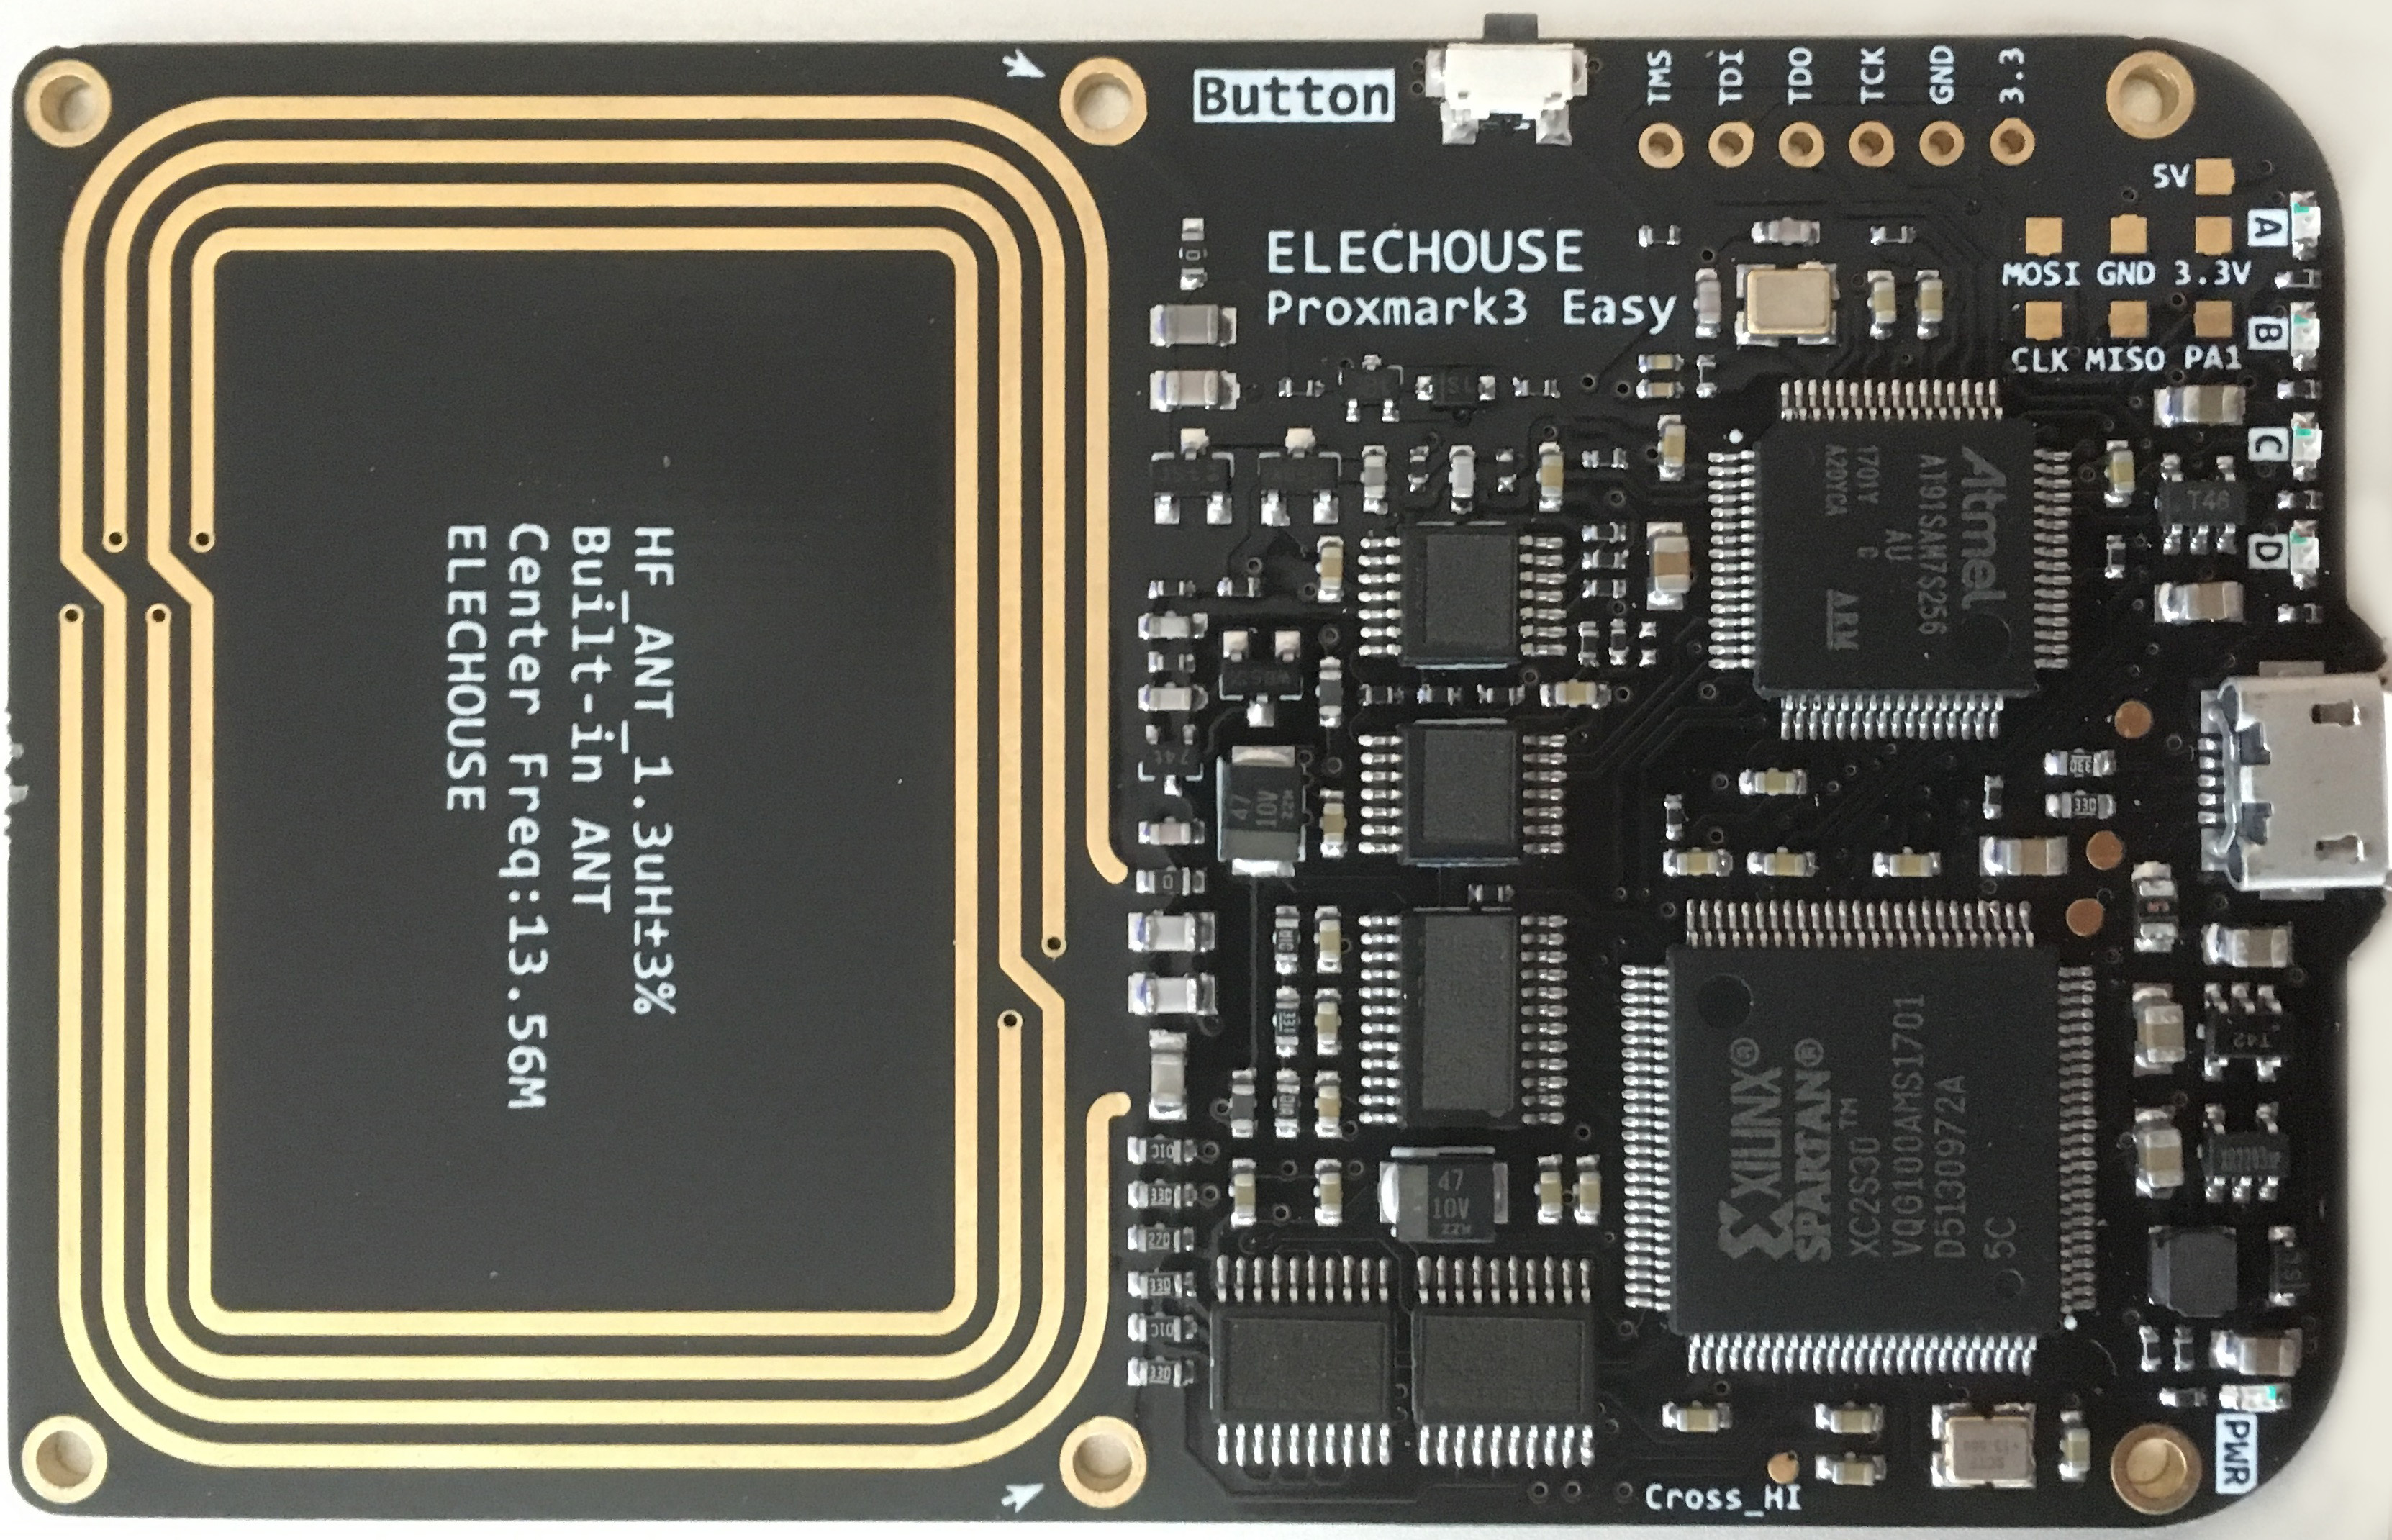
Proxmark3 is an open-source RFID swiss-knife which can be used to sniff, duplicate and emulate different cards on both high frequency (13.56MHz) and low frequency (~125KHz).
The project consists of three significant parts:
- Client software running on a computer to handle heavier calculations, storage, and communicate with the device firmware
- Device firmware that runs on the AT91SAM7. Also includes a FPGA bitstream that is automatically uploaded.
- Hardware that typically includes the AT91SAM7, FPGA and RF frontend. Some variants contain connectors so that the antennas can be swapped.
Chinese Proxmark3 devices have sprung up at ~US$65, but there are some caveats for this incredibly low price which we will discover in a bit.
Wed, Jul 18, 2018
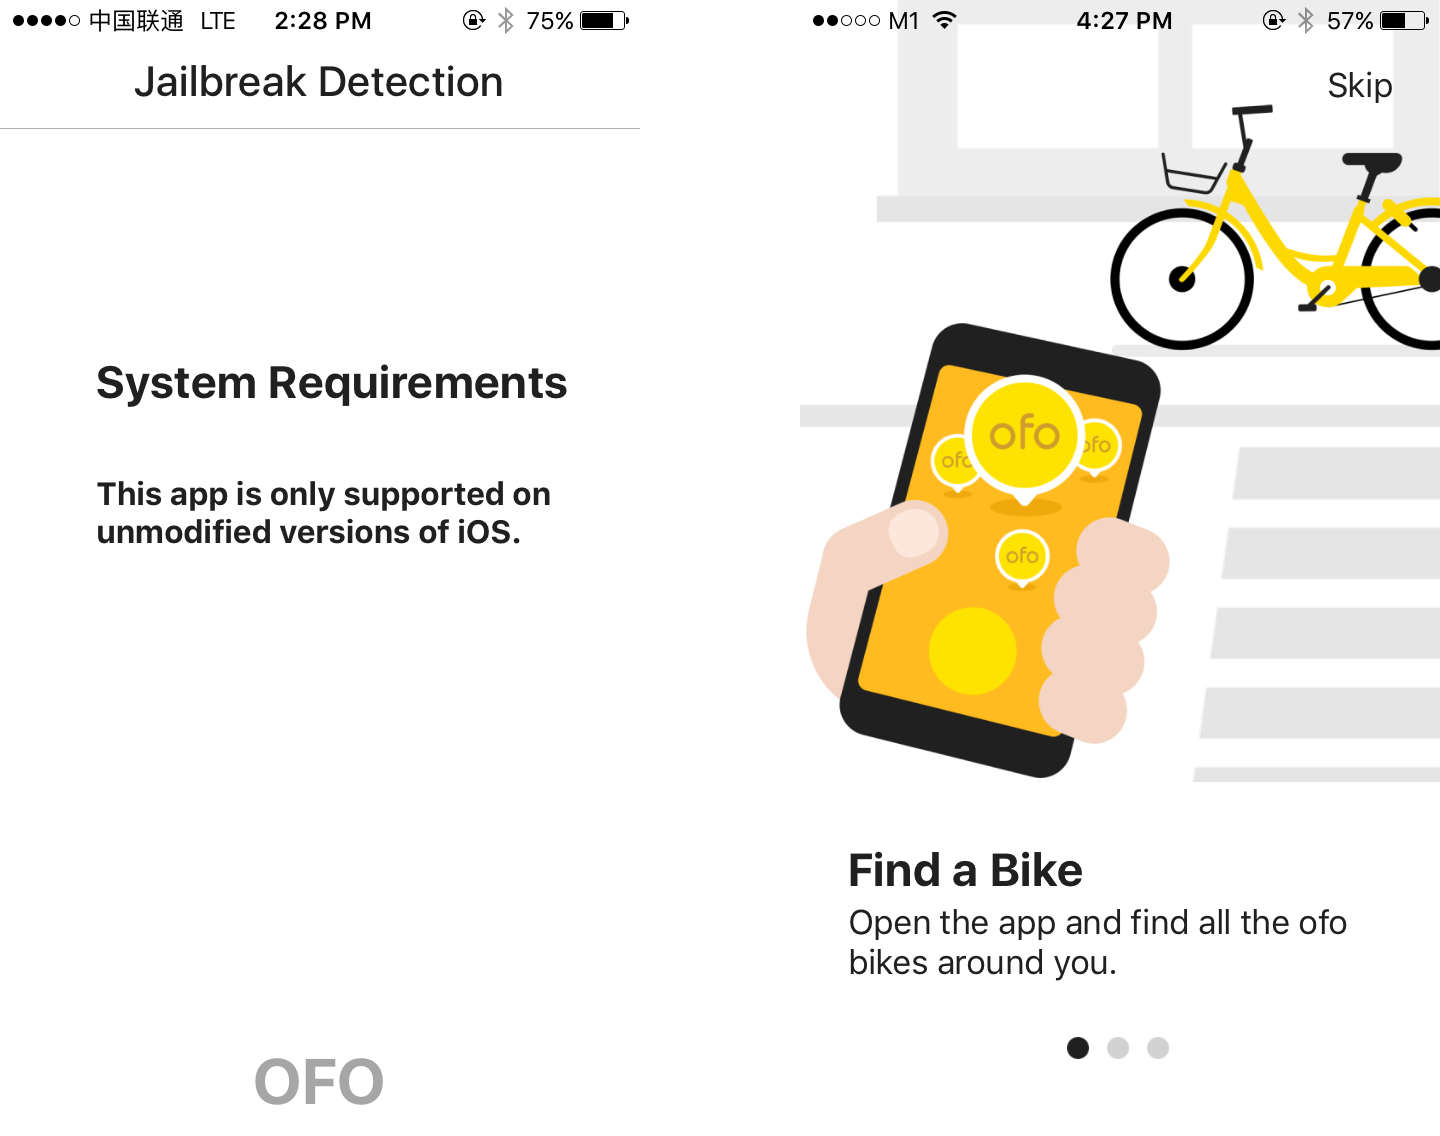
Previously, I could not use ofo’s app due to their rather aggressive jailbreak detection.
While in Shenzhen, I could not use ofo’s bike-sharing app as they presumed my iPhone to be jailbroken. The app was not strictly wrong - my iPhone once used a non-persistent tethered jailbreak. However, the iPhone’s bootchain integrity was restored after rebooting, and only Apple-approved code were permitted to execute.
I was determined to take a stab at this issue when I returned, as other apps that implemented jailbreak lock-out functions such as WeChat still ran fine on my phone. I had a hunch that the detection code looked for files (or results of files) that shouldn’t exist in a jailed device, as jailbreaking allows mounting of the root partition / as read-write.
Thu, Jun 7, 2018

Circles.Life launched a head-turning “Flexi $0 plan” that claims that there’s no catch.
However, my initial experience with them did bring up some peculiarities:
- There’s a hidden S$6 registration fee
- “Flexi” $0 plan is hidden during registration
- Contradicting information about their iOS/Android CirclesCare app
Sat, Jun 2, 2018
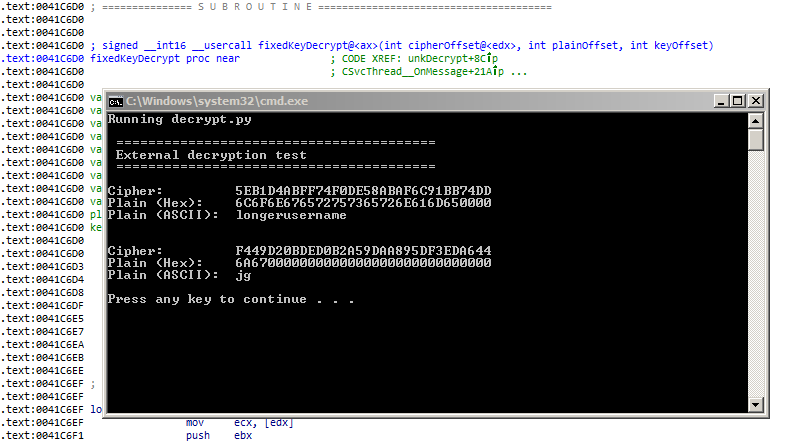
Accessing a PE’s function via Python!
There may be occasions where a PE binary contains helpful functions that could be reused elsewhere. If the function’s implementation is not critical, it may be possible to rip the code out as-is. The function will then be used as a black box where input data is processed and returned as an output without knowledge of its internal workings.
There are some applications where this technique could be especially useful:
- Using features from legacy binaries such as proprietary parsers
- Implementing encryption/decryption functions
- Building keygens
Recently, I was disassembling a binary that had a function to decrypt a block of data. At over a thousand lines of x86 instructions, the function proved to be tricky to re-implement, hence I thought of trying this process as an experiment.
Wed, Feb 28, 2018
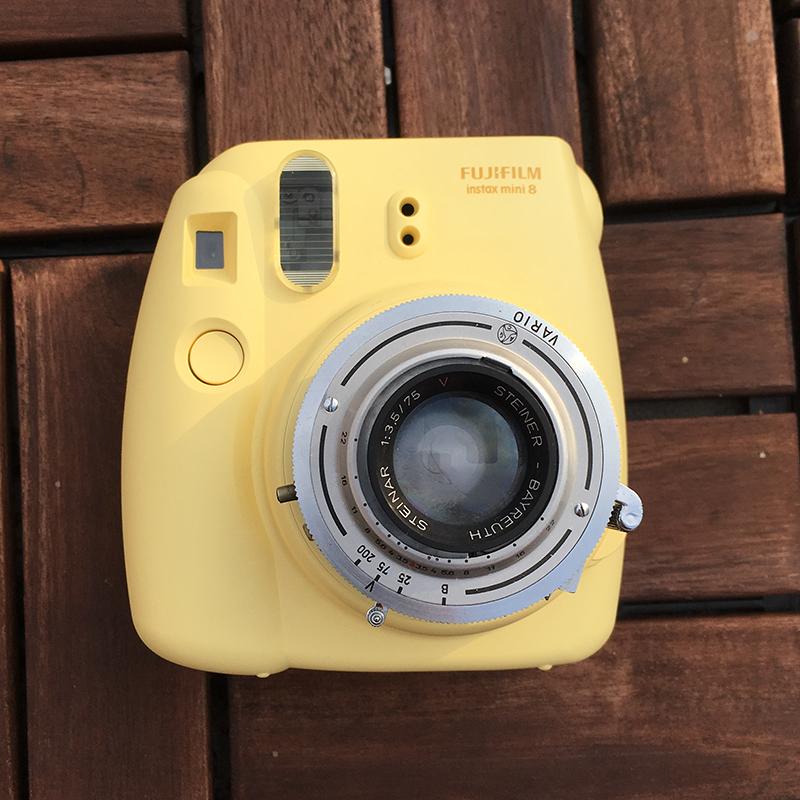
Meet the Instax-Paxina, with a 75mm, f/3.5 lens!
The idea of an “instant film back” for large format cameras has been explored before, but I thought it would be exciting to try the opposite - to mount a medium format lens and shutter onto an Instax instead.
The process would (ideally) involve removing only the optical elements and the shutter from the Instax, while preserving the rest of its functionality, so that the camera is still able to process and develop the exposed film.
Fri, Jan 19, 2018
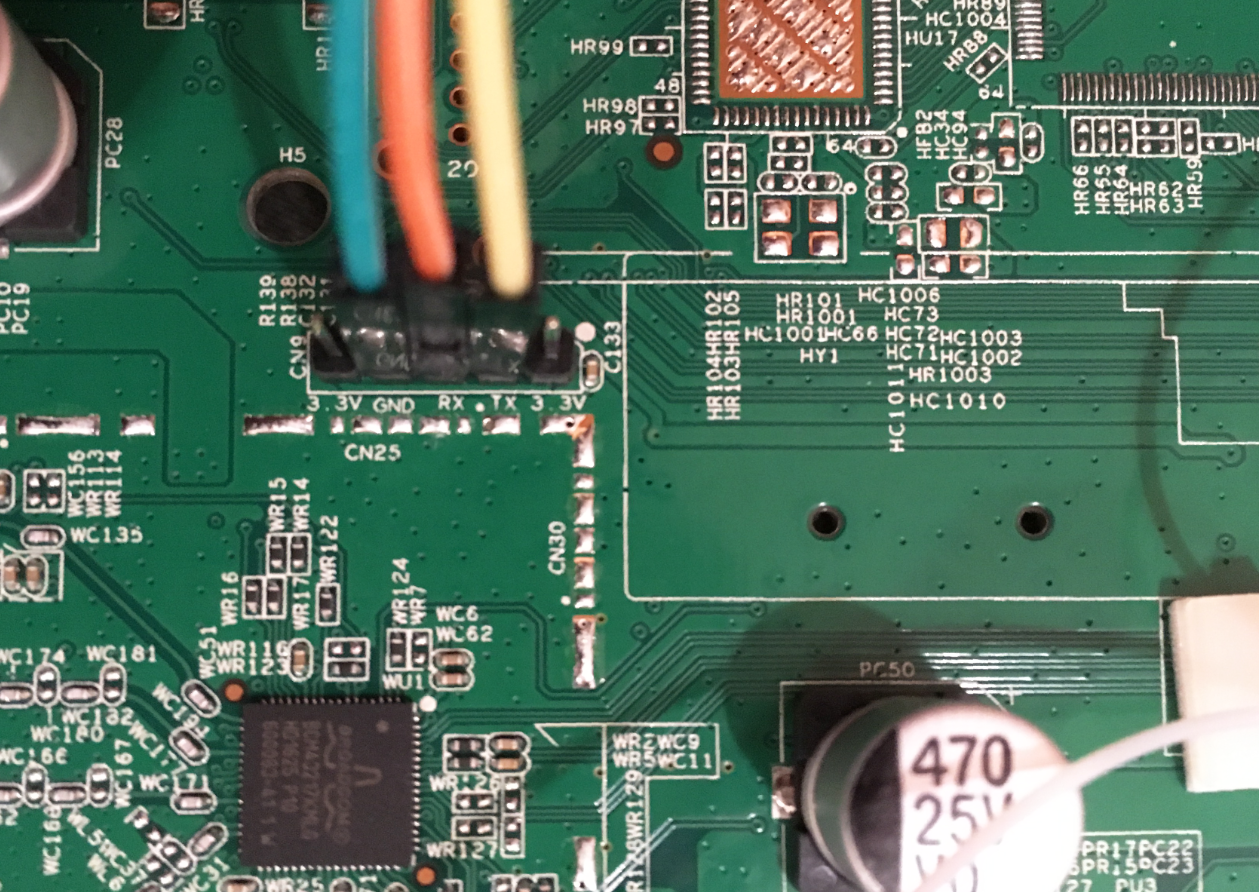
Finding the UART on a Broadcom device usually enables access to its CFE, and consequently access to the device’s flash memory
In the past, device firmware files were typically made available to users by their respective manufacturers. A recent trend has emerged where ISPs are completely managing their consumer premise equipments, including provisioning and firmware updates. As such, publicly available firmware files may be scarce or unavailable for some new ONTs or routers.
It may be possible to extract the current firmware (or recovery image, stored in alternate bank) in the right situation:
- Device is based on a Broadcom processor
- UART pins/pads/headers are available
- CFE (Broadcom’s bootloader) is recent enough
- CFE is not deliberately crippled by manufacturer
- Prerequisite hardware is available to access the UART
Thu, Dec 7, 2017
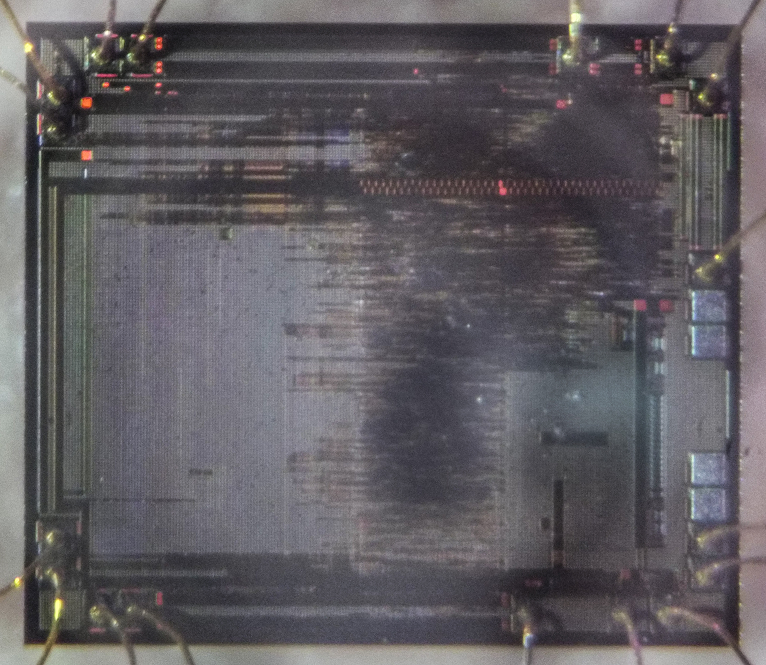
There are only two hard parts about IC decapsulation: obtaining a usable acid and doing it safely.
Recently, I ordered some exotic integrated circuits which were only available in China via Taobao. Obtaining ICs from China is a hit-or-miss process, as the products may be new (ideal), used (still okay), “compatible” (barely usable), or fake (unusable).
Chip packaging and die markings are easily faked, hence decapsulation is a practical method to expose the IC’s die, and thus verify if the chip is usable by comparing it with a decapsulated original die.
Fri, Oct 27, 2017
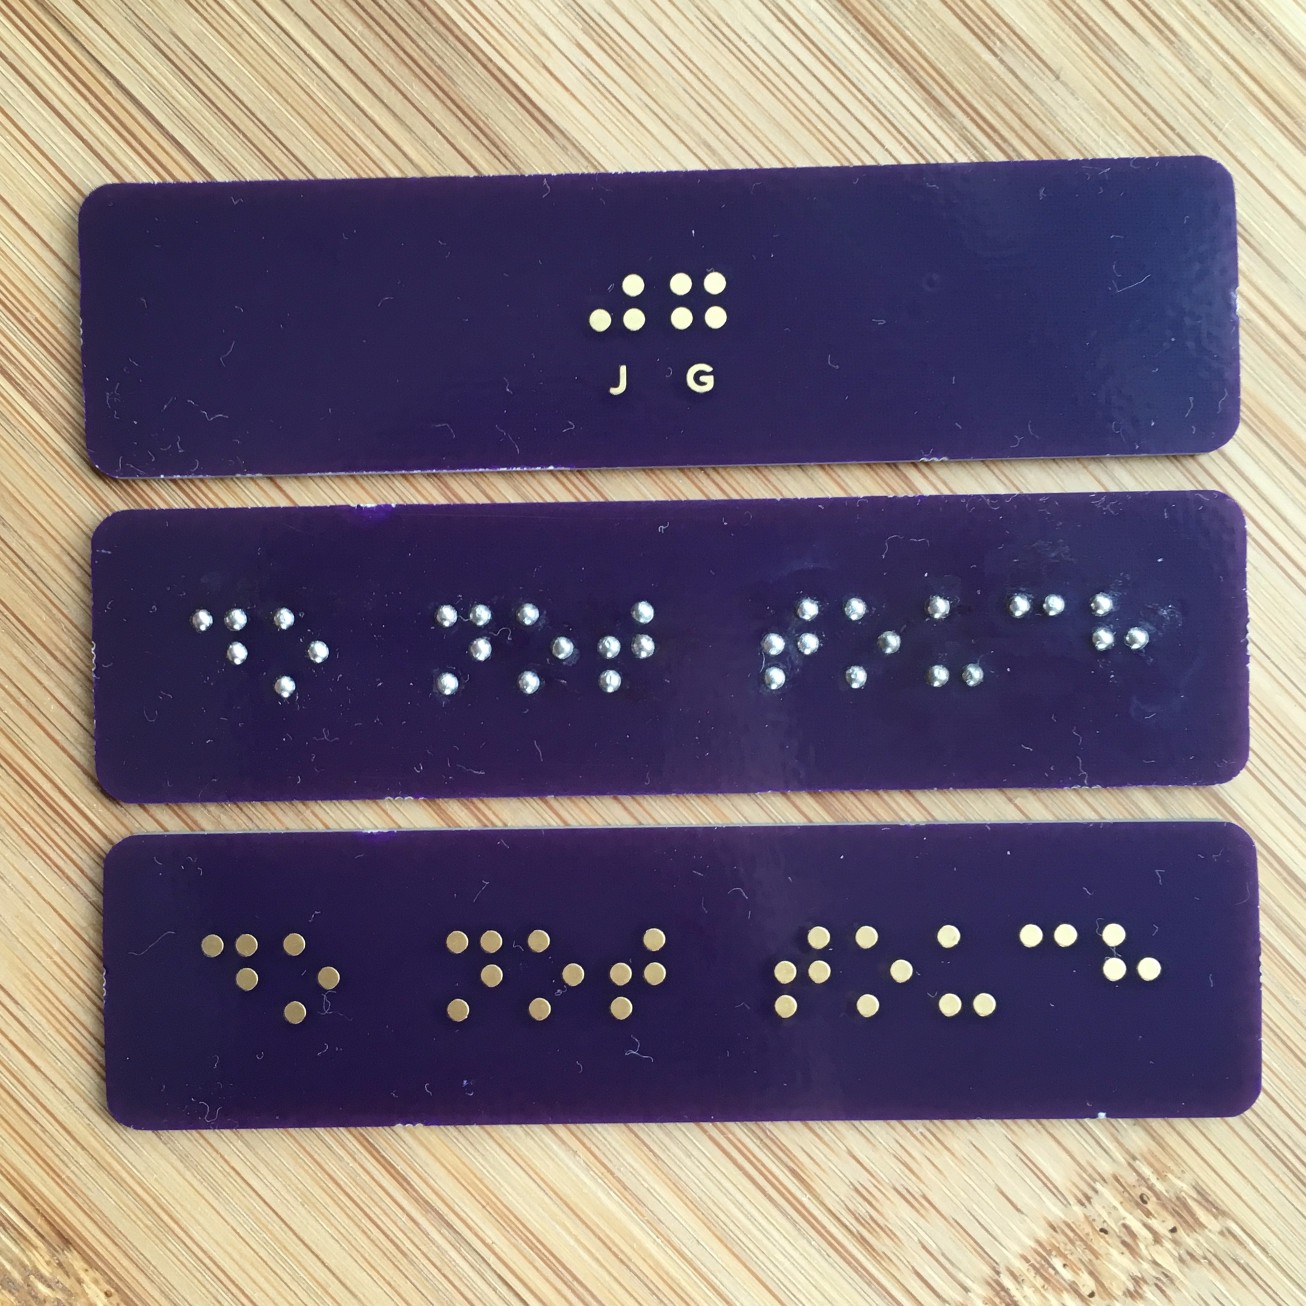
This was designed and processed in the comfort of home! Hopefully this technique may enable more people to improve accessibility for the visually impaired.
A while ago, I passed some damaged Braille signs and felt that repairing them may be difficult or infeasible. It led me to wonder about how one could go about building a Braille signage. Typical commercial approaches involve:
- Accurately punching sheet metal
- Pressing (and binding) metal bearings into plastics
While working on PCBs, I also noticed that solder tends to form a prominent bead on round pads. I decided to design, order and build a bunch of Braille PCB signs as an experiment, and so far it appears to be excellent!
Fri, Oct 13, 2017

TL;DR: Attach the US$26 Fujian CCTV lens on the Yi Camera to achieve a lovely depth effect. More photos below
The depth effects on modern phone cameras are attractive especially in portraiture, but are only available on select high-end models which usually costs a pretty penny.
Furthermore, this effect is generated by interpolating the image data of two cameras with different focal lengths, and consequently leads to undesirable effects such as clipping of fine details such as hair.
I set out to achieve this depth effect on a (peasant) budget, using my existing Yi Camera (~US$60) and having some requirements in mind:
- Lens with appropriate focal length. Too much focal length results in an overly-zoomed image, while having too little leads to in a mild bokeh and insufficient focusing travel.
- Lens with a wide aperture. A lower f-number is desirable in selecting a lens and also while shooting. Prime lenses are ideal here.
- Large enough imaging sensor. Larger sensors will capture a greater (apparent) depth of field. Coincidentally, the best sensor I’ve seen so far in the budget action camera market is the IMX206 at
1/2.3 inch , found in the original Yi Action camera and some SJCAM products.
- Proper composition. The distance between the camera and subject should be kept to a minimum, and the distance between the subject and background should be increased to achieve a stronger blur.
Sat, Jul 1, 2017

Shiny..
A while ago, I chanced upon a satirical “boy scout badge” featuring the text “Centered vertically in CSS” by @mrgan.
I had little experience with fabric, but building a lapel out of PCB seemed like something that might just work. PCBs are typically built with extremely high tolerances for its copper and mask layers and still acceptably accurate for the silkscreen.
Hopefully this post documenting my build process will be helpful if you’d like to give PCB lapel designs a shot!
Wed, Jun 14, 2017
MacsFanControl is this utility that enables manual controls for my Macbook’s fans on Windows. Recently, I had the unpleasant chance to interact with their update mechanism.
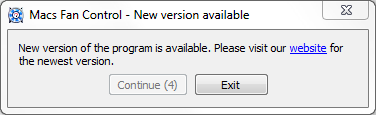
The update prompt must be acknowledged, and there is user-configurable option to disable or ignore the updates. Considering the app works just fine as it is, along with the fact that future updates will still have this issue, I chose to disable the updater permanently.
Sat, May 27, 2017
Note: this is a recollection of my memory (and source files) from about 2 years ago
How would I go about changing the MAC address (permanently) on this AX88179 USB 3.0 device without breaking it open?
I found myself with an unusual challenge - the MAC address of many networking devices, if not already burnt into One-Time Programmable memory, could possibly be stored in an external (rewritable) EEPROM. Breaking open the device and directly accessing the EEPROM would be trivial, however I was unwilling to scuff the glossy plastic enclosure; I sought to do this without dismantling the device.
Wed, May 24, 2017
 Wireless doorbell being triggered. No, it’s not someone else’s :^)
Fixed-code wireless systems are not unlike having someone shout a specific password to open a door (or anything else) with a certain pitch and speed, except that this occurs in the electromagnetic domain instead of moving air.
This can be best described as “security-by-obscurity”, or, hoping that others are unable to capture and replay the signal. However, readily-accessible and affordable hardware is now within reach of most. As of writing, US$23 nets all the required parts to do just that.
Radio Frequency shares much with sound, so this post will attempt to draw similarities between them. Lets get going!
Wed, May 17, 2017
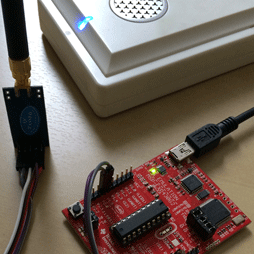
NDP 2019: My friend Kheng Meng has already documented about the 2019 edition, even before the official event. Check it out!
The NDP 2016 Pixmob band - thousands mesmerized, documented by many, but still not hacked to run custom code.
This (fairly lengthy) post documents how I learnt about the ISP protocol, built a board to implement it and integrated it with the Arduino IDE.
The Pixmob band

Within the milky plastic enclosure lies a compact board comprising of
- IR Sensor (38KHz)
- Vibration sensor switch
- RGB LED
- I2C EEPROM (AT24C02S)
- ABOV MC81F4204
- CR2032 battery (~3V)
Everything listed is available as a jellybean part except for the very unusual MC81F4204,
The ABOV (MC)81F4204
“8-bit MCU, 4KB Flash, 192B RAM using a custom architecture (“810 Core”)”
Takeaway: difficult to source, ancient proprietary IDE, requires a special programmer
Also: No UART. 192 bytes of RAM
Sat, May 13, 2017
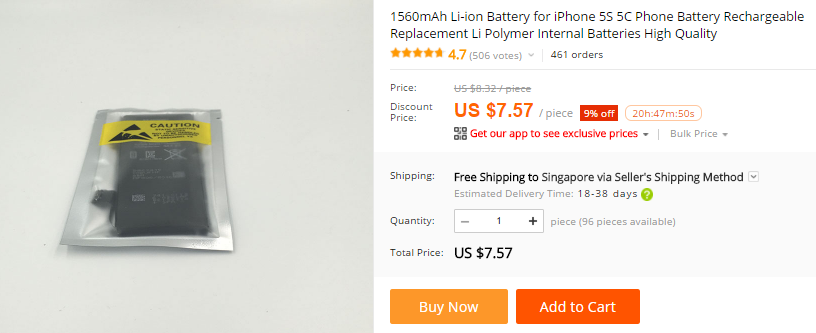
Purchasing a replacement battery for an iPhone (5S) from typical Chinese sources yield fantastic prices, but they rarely match up with their advertised capacity.
What’s in an iPhone battery?
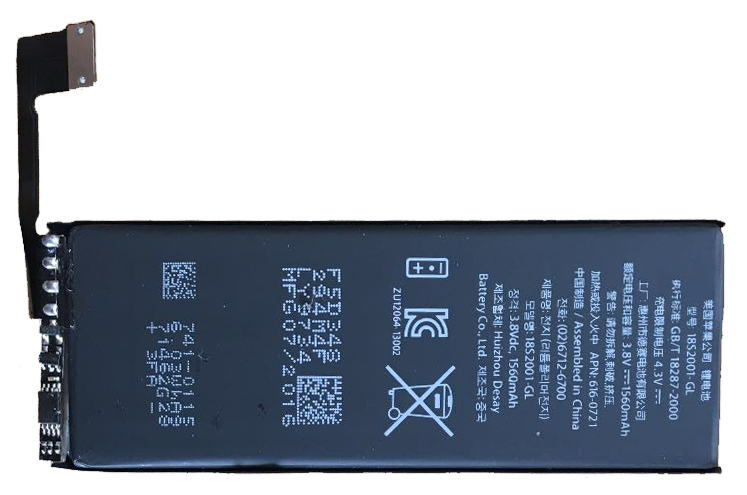
Above: What sellers describe as an “OEM” battery. I’ve removed the tape off the battery controller. It is difficult to discern between this and the “Apple Original” battery.
The 2 significant parts of an iPhone battery are:
Lithium Polymer battery (“1S1P”). The remaining capacity of the battery can be approximated by its voltage, at ~3.7V flat, and ~4.2V full. The iPhone 5S has a 1560mAh battery.
The charge controller. This tiny board contains circuitry to protect the board from over-temperature, over-charge and over-discharge, and also reports the battery’s vitals such as its charge state. The 5S board contains the Texas Instrument’s bq27545 and the proprietary flex cable, and is spot welded on the battery’s terminals.