Defeating wireless fixed code systems with just US$23
Wed, May 24, 2017 Wireless doorbell being triggered. No, it’s not someone else’s :^)
Fixed-code wireless systems are not unlike having someone shout a specific password to open a door (or anything else) with a certain pitch and speed, except that this occurs in the electromagnetic domain instead of moving air.
This can be best described as “security-by-obscurity”, or, hoping that others are unable to capture and replay the signal. However, readily-accessible and affordable hardware is now within reach of most. As of writing, US$23 nets all the required parts to do just that.
Radio Frequency shares much with sound, so this post will attempt to draw similarities between them. Lets get going!
What you’ll need
From your favourite Chinese retailers
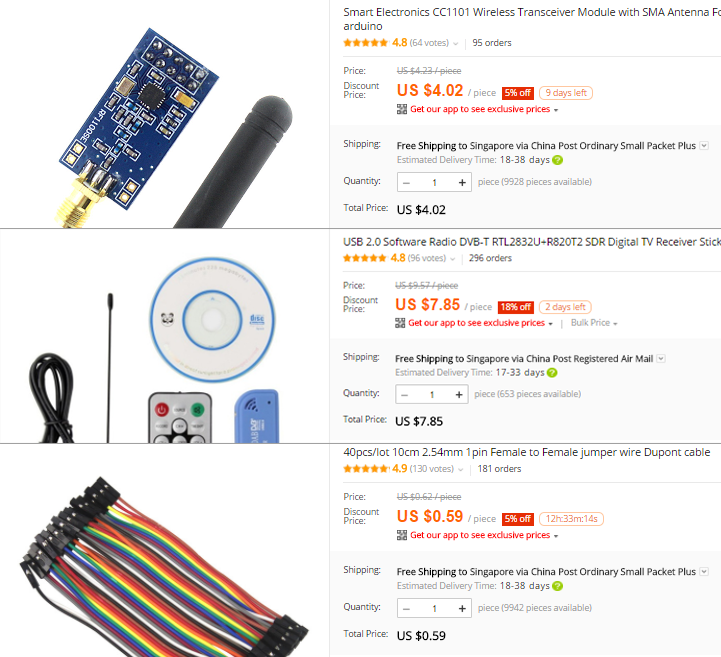
- RTL-SDR
- CC1101 module
- 2.54mm F-F jumper wires
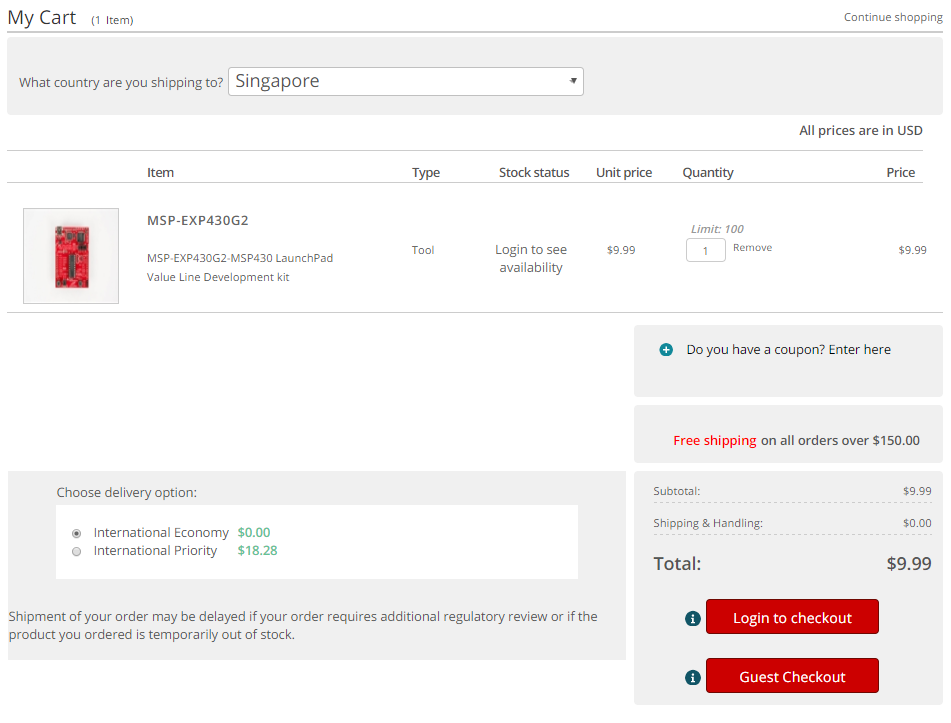
From Texas Instruments
Capturing the signal with a Software Defined Radio
A Software Defined Radio (SDR) is a piece of hardware that can continuously capture a chunk of radio bandwidth of your choice. A software usually accompanies the SDR to display the captured data in a FFT/waterfall display, and also allows you to tune to other frequencies or even record the signal.
SDRs are like expensive microphones for RF. They can record the “audio” and display visualizations like an ‘equalizer’. The radio spectrum is huge, and the microphone can only work on a small chunk (like the bass or treble) at any time, but you can tune it to your liking within its hearing range.
RTL-SDR: The SDR that was never meant to be

Generic RTL2832U+R820T2 with antenna as shown on Aliexpress
The RTL-SDR is an affordable TV and FM radio receiver. Some brilliant folks figured a method to have it dump raw radio data, essentially turning it into a $8 SDR.
Sure, the specs are not enviable - it captures about 2MHz of bandwidth (how much can be heard at any point of time) from 52MHz-2200MHz (the hearing range) with an 8-bit ADC (whether it sounds like an old telephone or new headphones), but it’s a really effective tool for its price.
As this is a receiver, it has no transmit capabilities.
Setting up SDRSharp
SDRSharp is a straightforward application to work with the RTL-SDR. Additional steps are required to configure SDRSharp to work with RTL-SDR.
Retrieving prerequisite files for RTL-SDR
- Connect your RTL-SDR with antenna to your device. Do not use the provided CD
- Unarchive SDRSharp into a folder anywhere you like
- Run
install-rtlsdr.batand let it do its thing
One time setup: Loading WinUSB drivers with Zadig
- Run zadig.exe
- In the menu, select
Options>List All Devices - Under the Device dropdown: pick
Bulk-In, Interface (Interface 0) - Click
Install Driver
Upon completion, the Driver field should display WinUSB with its version. Zadig can be closed after that.
Testing SDRSharp
- Run
SDRSharp.exe - On the left pane, under Source, select
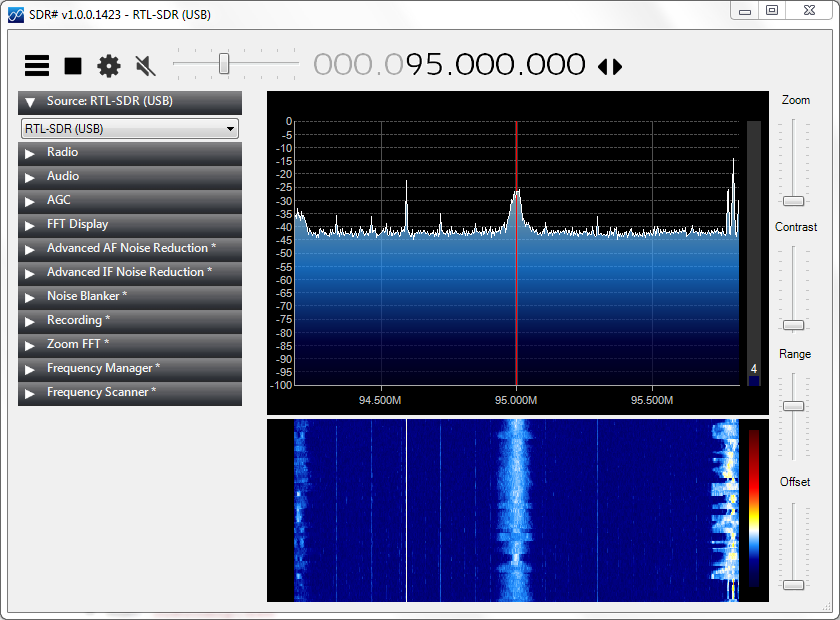
RTL-SDR (USB) - On the frequency picker (the numeric display on top), set it as
95.000.000(95MHz) where there should be some local FM radio - Click the “Play” button. You should hopefully see some signals!
Finding your target’s signal
Next up is identifying your transmitter’s signal. Transmitters are legally obliged to operate within certain frequencies, of which the usual ones are:
- 300 MHz – 348 MHz (typical: 315MHz, 330Mhz)
- 387 MHz – 464 MHz (typical: 433MHz)
- 779 MHz – 928 MHz (typical: 915MHz)
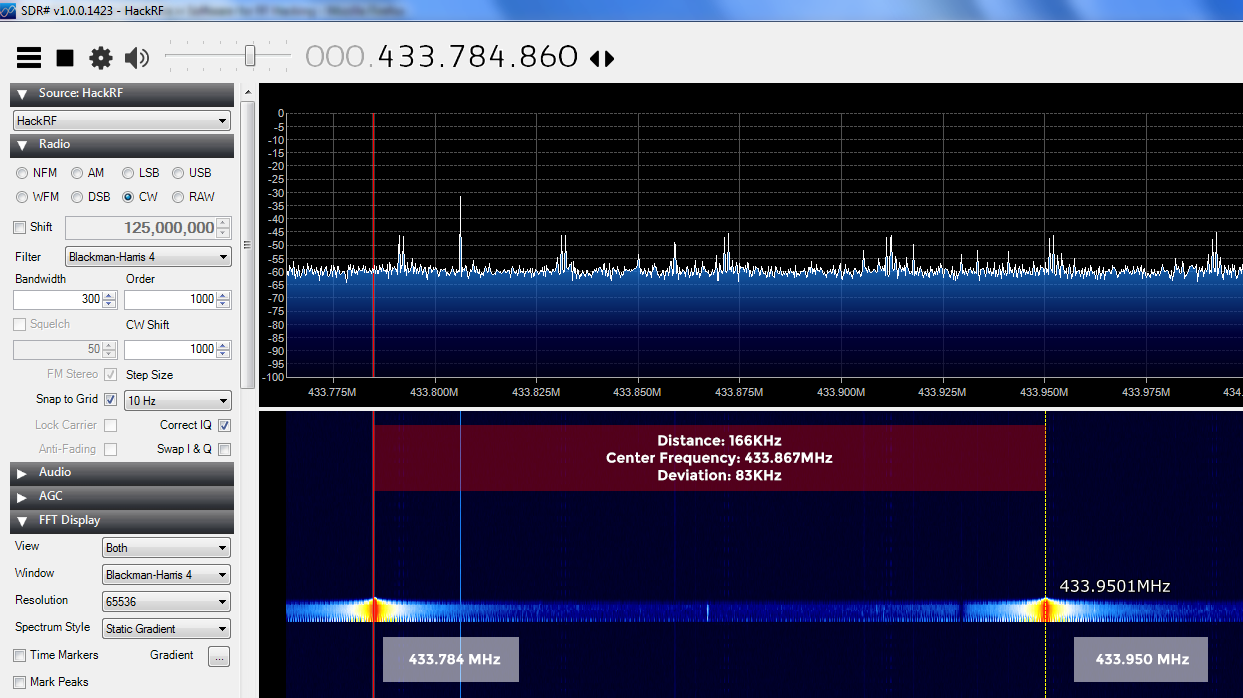
By tuning to a frequency (e.g. 433MHz) and activating the transmitter (pressing the doorbell), SDRSharp’s display may react accordingly if it is the correct frequency.
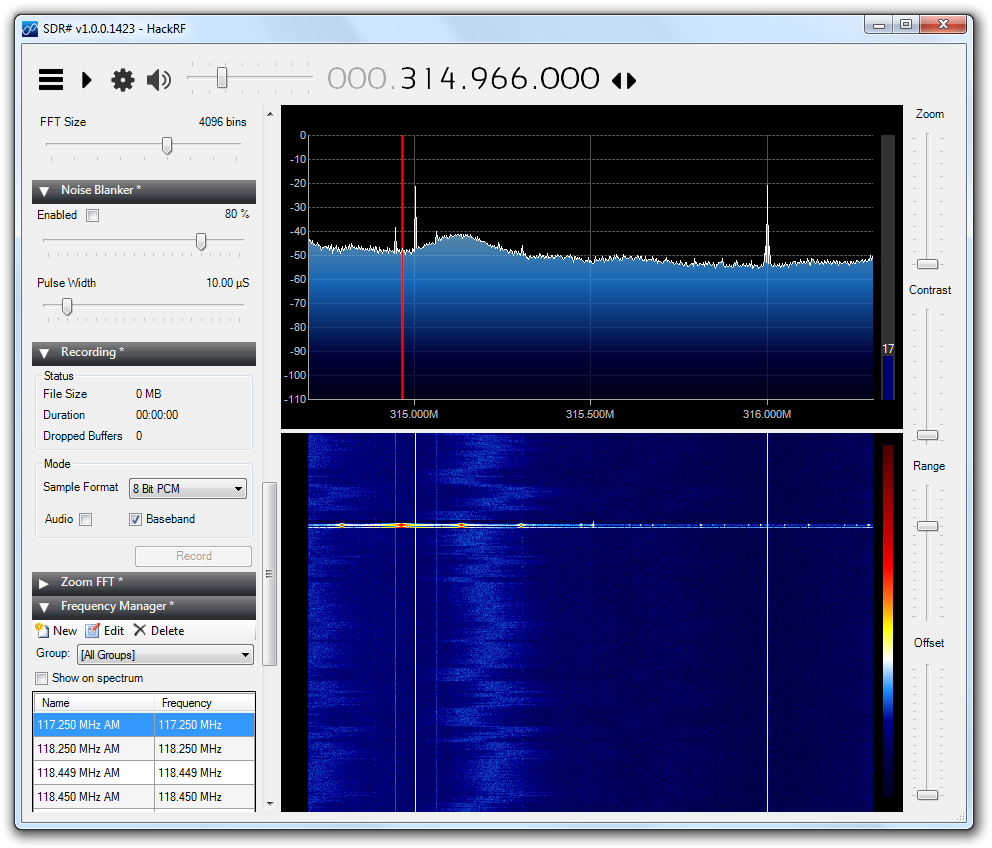
The signal here is strongest at 315MHz. (I’ll be using a doorbell to lead the examples)
Another way to go about identifying the target’s operating frequency is to look at the device itself. Transmitters frequently contain certification data like their FCC ID, and the operating frequency may be included on the label. The FCC ID itself may be used to look up the operating frequency too.
Recording the signal
A bit about radio modulation
Encoding information through radio, like sound, can come in various forms:
On Off Keying (OOK): switching between pulses and silence of varying length like morse code
(beep .... beeeeeeeep .... beep)
Frequency Shift Keying (FSK): switching between different “tones”. It might sound like an ambulance siren
(beep boop beep boop)
There are also other modes and variants (ASK, MSK, PSK etc). OOK is overwhelmingly preferred as its implementation is simplest, and therefore it is the most cost effective and prevalent.
Radio modulation matters here as the following instructions are OOK-specific.
Saving the signal into a file
After identifying the signal’s frequency in SDRSharp, clicking the midpoint of the signal will tune the radio specifically on the transmission.
On the sidebar, where the Source was set earlier on, scroll to the Recording pane and set the sample format to 8 Bit PCM, making sure that Audio is unchecked and Baseband is checked.
With the SDR running, click Record, activate your transmitter, and stop recording. A new .WAV file will be created in the SDRSharp folder containing the captured signal.
Visualizing the signal and decoding it by hand
Open the captured .WAV file with Audacity.
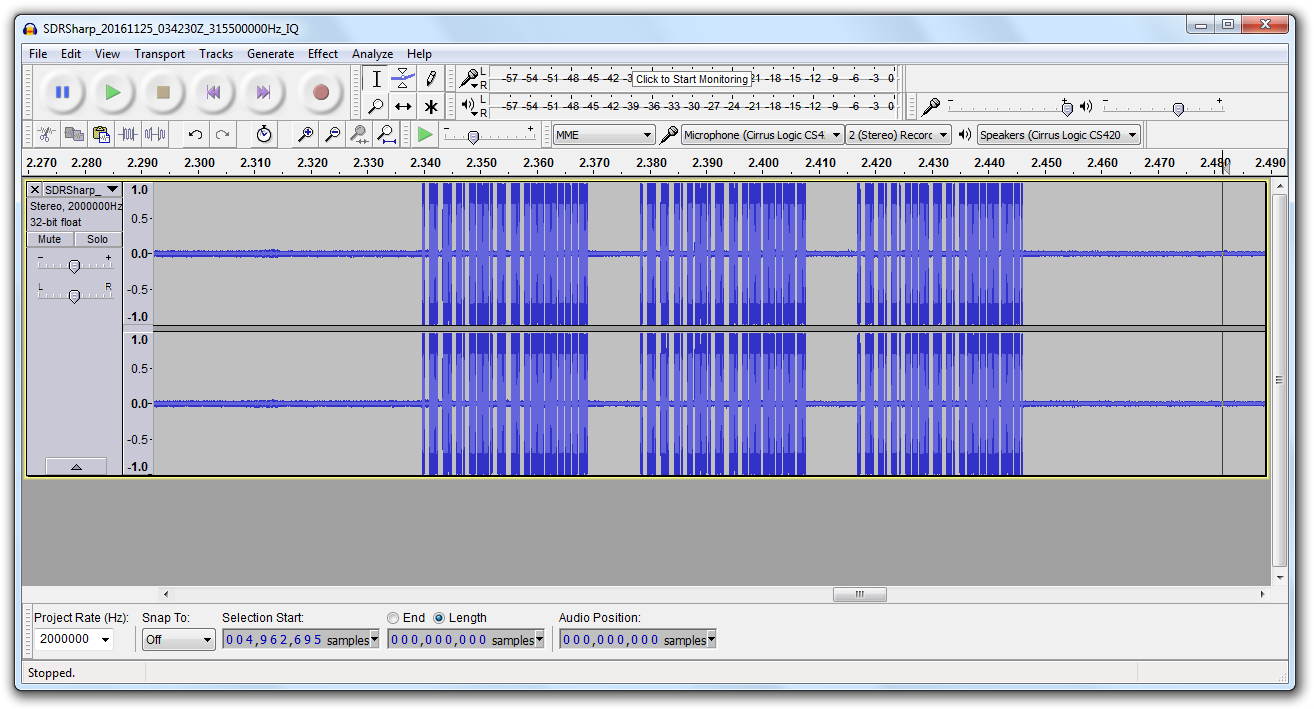
This is the captured transmission, and a specific pattern appears to have been repeated thrice when the doorbell was pressed.
Here, the marks (active transmission in blue) and spaces (quiet area in gray) are clearly visible. Lets decode the signal “by hand”. I’ll be using Photoshop (non-free) but GIMP should work as well.
Decoding the data
Using the Text tool with a fixed-width font such as Courier New, create a new text layer with the character | like:
||||||||||||||||||||||||||||||||||||||||||||||
Apply the Free Transform on the layer, and adjust the position of the layer and its size (use the handle) to try to align with the signal’s edges. Add or remove the | characters to fit.
Once the edges are aligned, use the Move tool and arrow keys to shift the | to sit in the “center” of the bits.
Using the Text tool again, remove the | and now type 1 where the area is blue and 0 where it is gray. This may seem tedious (hence “by hand”) but working through these 97 bits took only about 30 seconds.
Copy the result and paste it in a text editor of your choice. Group the bits in eighths,
and add 0s to the last group if it is not already an octet.
This:
1000111010001110100011101000111011101110100011101000111010001110111011101110111011101110111011101
becomes
10001110 10001110 10001110 10001110 11101110 10001110 10001110 10001110 11101110 11101110 11101110 11101110 10000000
The binary octets are then converted into hexadecimal. I did this by hand using Windows Calculator (in programmer mode):
0x8E, 0x8E, 0x8E, 0x8E, 0xEE, 0x8E, 0x8E, 0x8E, 0xEE, 0xEE, 0xEE, 0xEE, 0x80
The data is repeated thrice with some delay, so 0x00, 0x00, 0x00 is appended before repeating it thrice:
0x8E, 0x8E, 0x8E, 0x8E, 0xEE, 0x8E, 0x8E, 0x8E, 0xEE, 0xEE, 0xEE, 0xEE, 0x80, 0x00, 0x00, 0x00, 0x8E, 0x8E, 0x8E, 0x8E, 0xEE, 0x8E, 0x8E, 0x8E, 0xEE, 0xEE, 0xEE, 0xEE, 0x80, 0x00, 0x00, 0x00, 0x8E, 0x8E, 0x8E, 0x8E, 0xEE, 0x8E, 0x8E, 0x8E, 0xEE, 0xEE, 0xEE, 0xEE, 0x80, 0x00, 0x00, 0x00
And that is the transmitted data! Before we can transmit, we also need to know the baud rate (how fast the transmitter is speaking)
Getting the baud rate
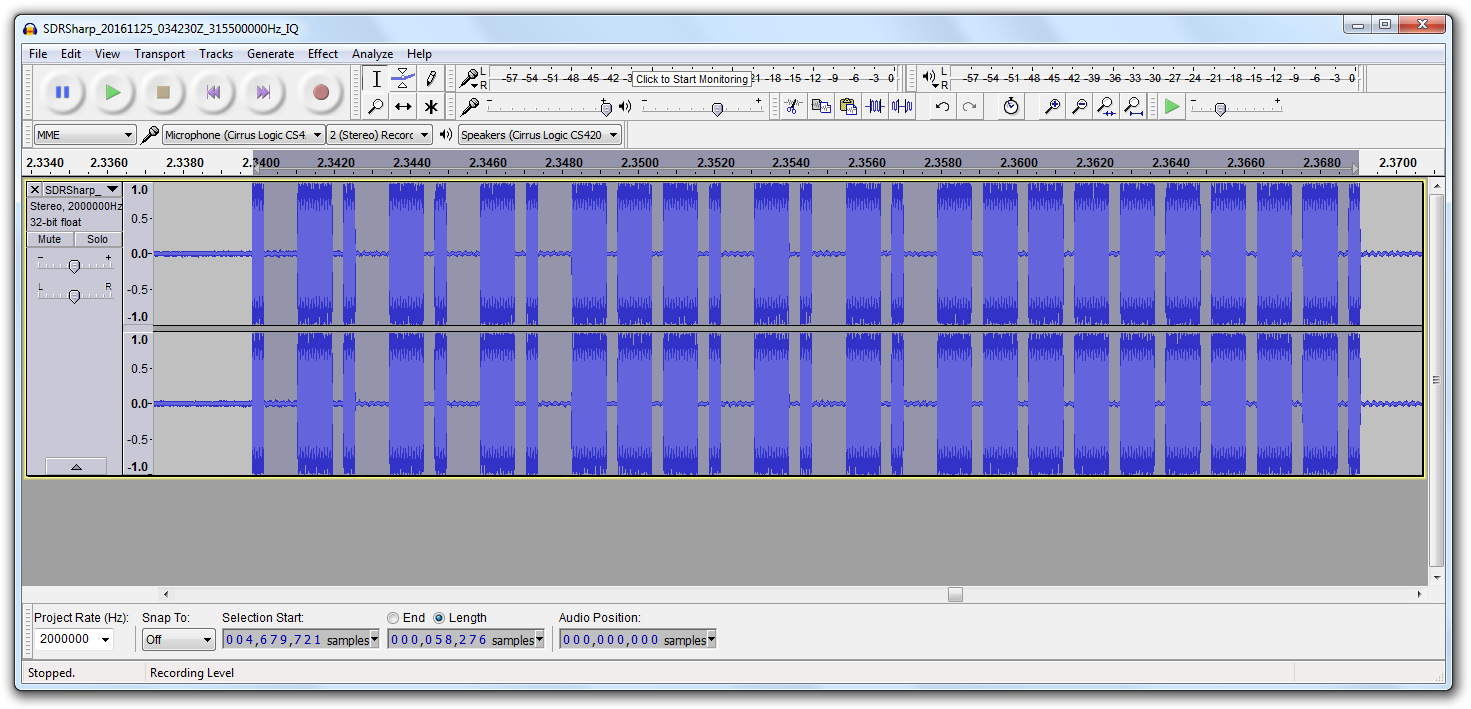
In Audacity, using the cursor and selecting a range will also indicate the duration in the number of samples.
Transmitting those 97 bits took a duration of 58276 samples, and the .WAV file was saved at 2,000,000 samples per second.
97 bits -> 58276 samples
1 bit -> 600 samples (rounded)
1 bit -> 600 samples / 2,000,000 Hz = 0.0003 seconds
Since one bit takes 0.0003 seconds to transmit, the number of bits that can be sent in a second is 1 / 0.0003 = 3,333 bits. Thus our baud rate is 3,333.
With the data and baud rate, and a known frequency (315 MHz in my case), we can prepare to transmit!
Setting up the transmit hardware
The RTL-SDR cannot transmit, and hence the CC1101 chip from Texas Instruments is used to do so. The CC1101 can operate within 300-928 MHz with some gaps, but has to be controlled by a separate microcontroller.
CCManager - TX interface for CC1101
CCManager (Github) is a simple but flexible control interface for the CC1101. It interfaces with a microcontroller bridge to control the CC1101 and has firmwares for the MSP430 and Arduino ProMini. I published it about 4 years ago in hopes that CCManager can enable TX capabilities for a low cost.
CCManager - Setup
From readme.md:
- Set up the hardware - connect
- CC1101 VDD - Launchpad VCC
- CC1101 GND - Launchpad GND
- CC1101 CSn - Launchpad P1.4
- CC1101 SCK - Launchpad P1.5
- CC1101 MISO - Launchpad P1.6
- CC1101 MOSI - Launchpad P1.7
- Enable hardware UART on the Launchpad by rotating the TXD and RXD jumpers (remove the 2 jumpers and reinsert them horizontally). The jumpers are found on the right side of the text “EMULATION” near the dotted line.
- Download and unarchive CCManager into somewhere cozy
- Install Energia, as well as the Launchpad serial port drivers.
- Run Energia and..
- Paste the contents of firmware/cc1101-launchpad-passthrough.c into the textarea
- Under Tools>Board, select “LaunchPad w/ msp430g2553 (16MHz)”
- Under Tools>Serial Port, pick the (usually) only option. If you have more than 1 entry, the largest number is typically the correct one.
- Select File>Upload
- Once this completes, you can close Energia
- Run CCManager.exe - when prompted for a serial port, pick the same one.
Transmitting
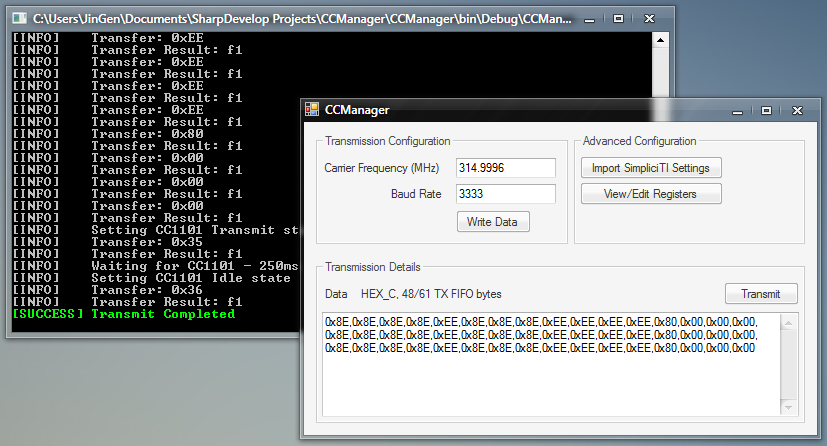
- Enter the Carrier Frequency at
315MHz- the value will be adjusted to the nearest available frequency - Enter the calculated baud rate from earlier on at
3333 - Click Write Data
- Paste the hex-encoded data from earlier into the large textarea
- Click Transmit
Your target should respond as it would to the transmitter! Congratulations!!
Its a bit unsettling to see how easy this whole process is, especially for a determined adversary. Hopefully with greater awareness comes improved security..
Notes
What’s up with the 61 byte limitation?
As transmissions are timing sensitive, CCManager pushes bytes into the CC1101 FIFO, limited to 61 bytes and the CC1101 transmits based on that. Asynchronous modes are possible but requires rewriting the CCManager and firmware.
Can it do FSK?
Yes - in fact it should be (theoretically) capable of GFSK, 4-FSK, MSK too, as long as the registers are configured to do so.
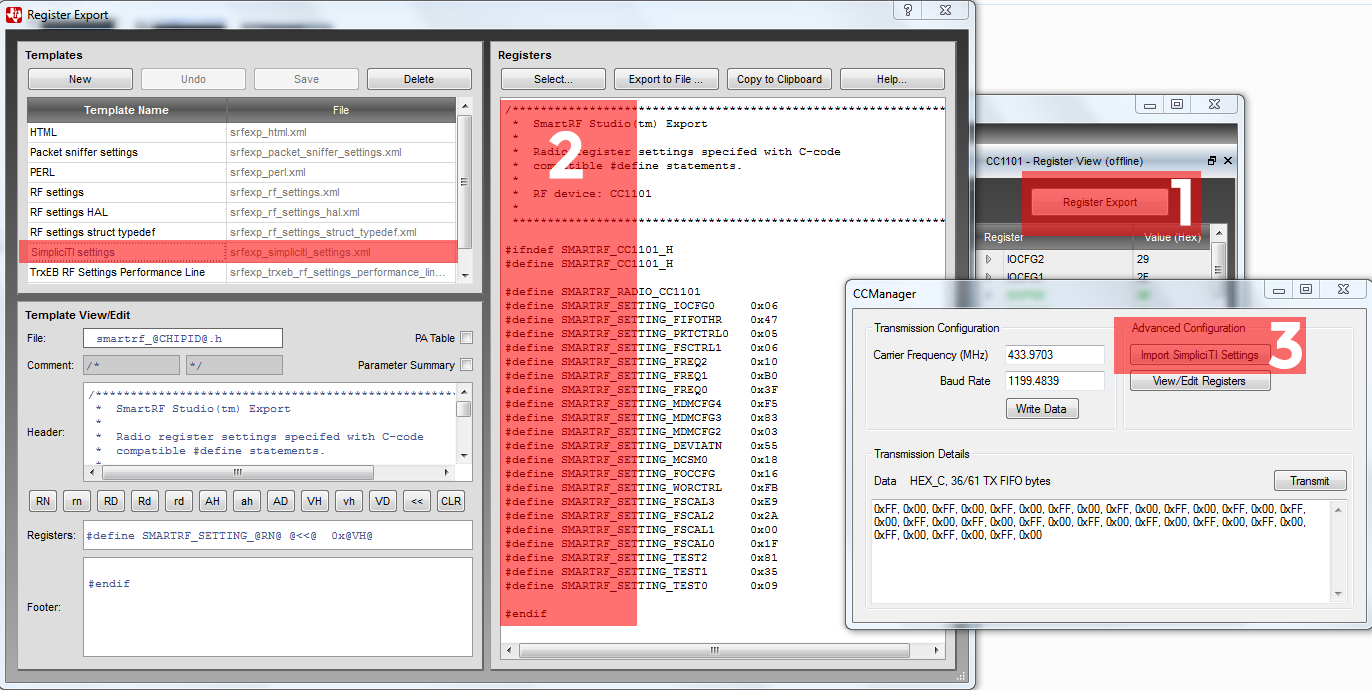
CCManager can automatically import and load TI SmartRF configurations for advanced users!
Thank you GSG!
Huge THANK YOU to the folks at Great Scott Gadgets (Michael Ossmann, Taylor Streetman & team) for supporting me and my projects by donating a HackRF One.
 Even comes with a throwing star (LAN tap)!
Their SDR course (free!) with the HackRF One has been incredible in helping me grasp the fundamentals of RF and I cannot recommend it enough.