RGB delete on a cheap(ish) keyboard
Tue, Aug 12, 2025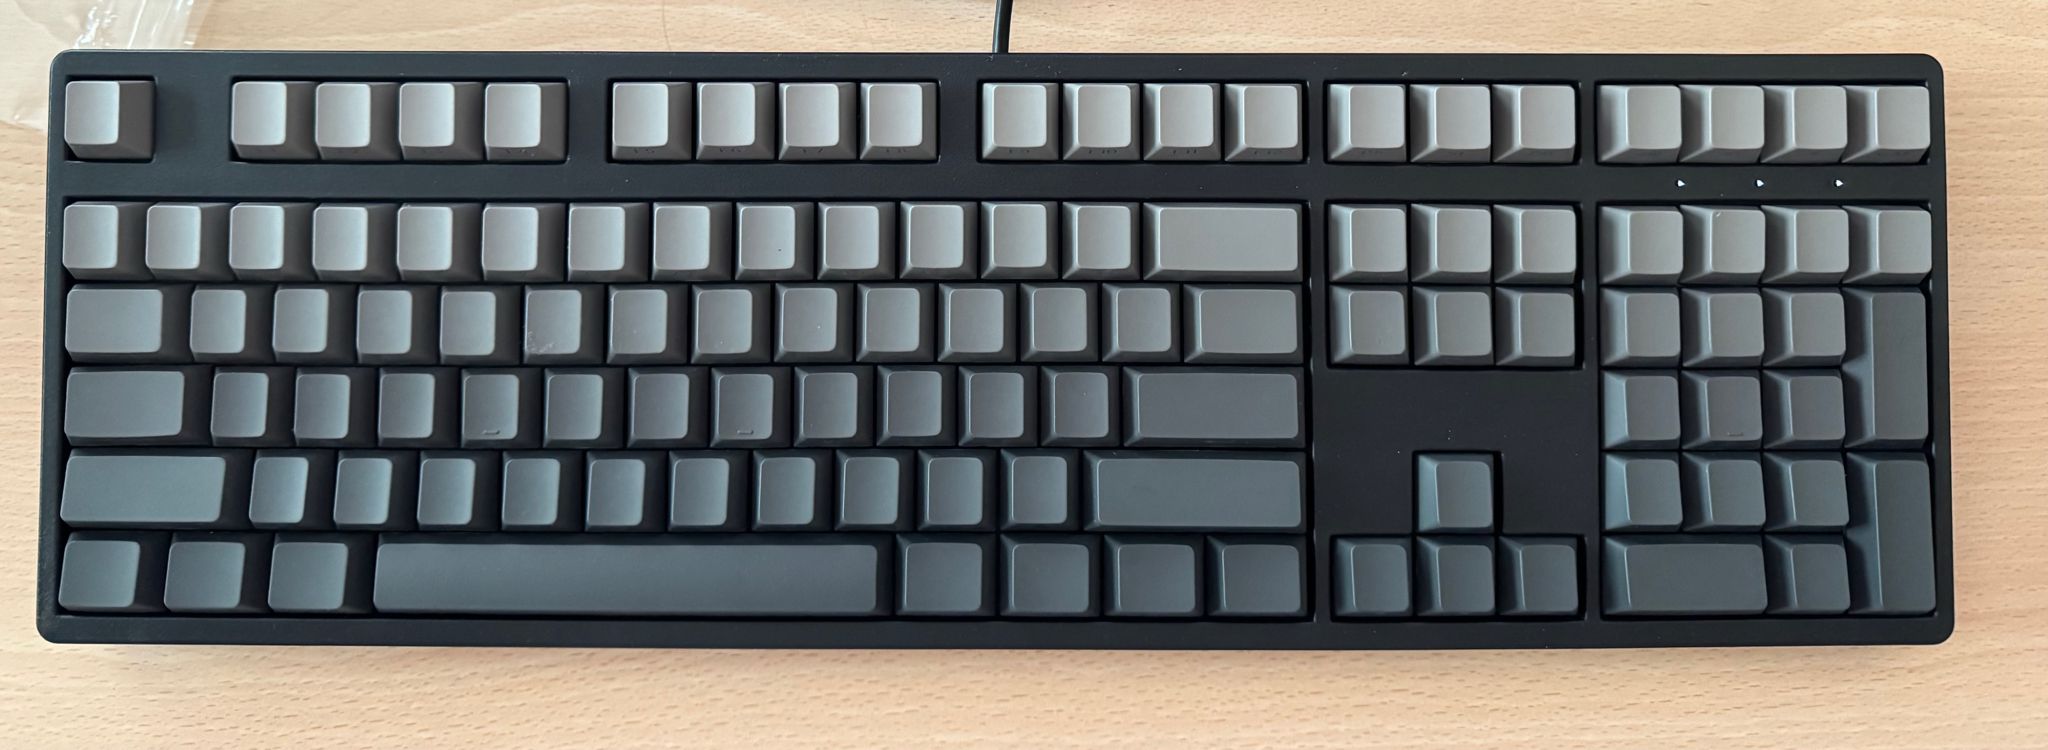
I recently bought this “Yinren R108” keyboard off Taobao and there’s a lot to like about it. It’s a simple 108-key keyboard with preinstalled hot-swappable Peach V3 switches, and is well priced at about S$88 (~US$70).
It doesn’t come with any vendor branding, has legends on the side of its PBT keycaps, and uses USB-C. The switches sit on a steel plate so the keyboard has some heft and is sturdy. It even has a detachable top cover that is neatly held on by magnets.
However this keyboard has a quirk where it does this tacky gamer RGB-LED rainbow animation for several seconds whenever it is powered on. Sure, it’s cheap, but it doesn’t have to scream that part out loud. Also, there’s no way to turn it off.

The first plan that came to mind was to check the type of controller that this keyboard comes with; if it’s a well supported target such as an stm32 (or clones), the quick and easy way would be to flash a firmware like qmk and configure it so that the LEDs remain off.
It turns out that this keyboard uses a rather obscure “BYK916”, which like most things in this universe, runs on an 8051 core. As far as I know, there isn’t even a datasheet for this specific chip; we just happen to know that it’s very similar to another chip, so we’re just going to use that datasheet instead.
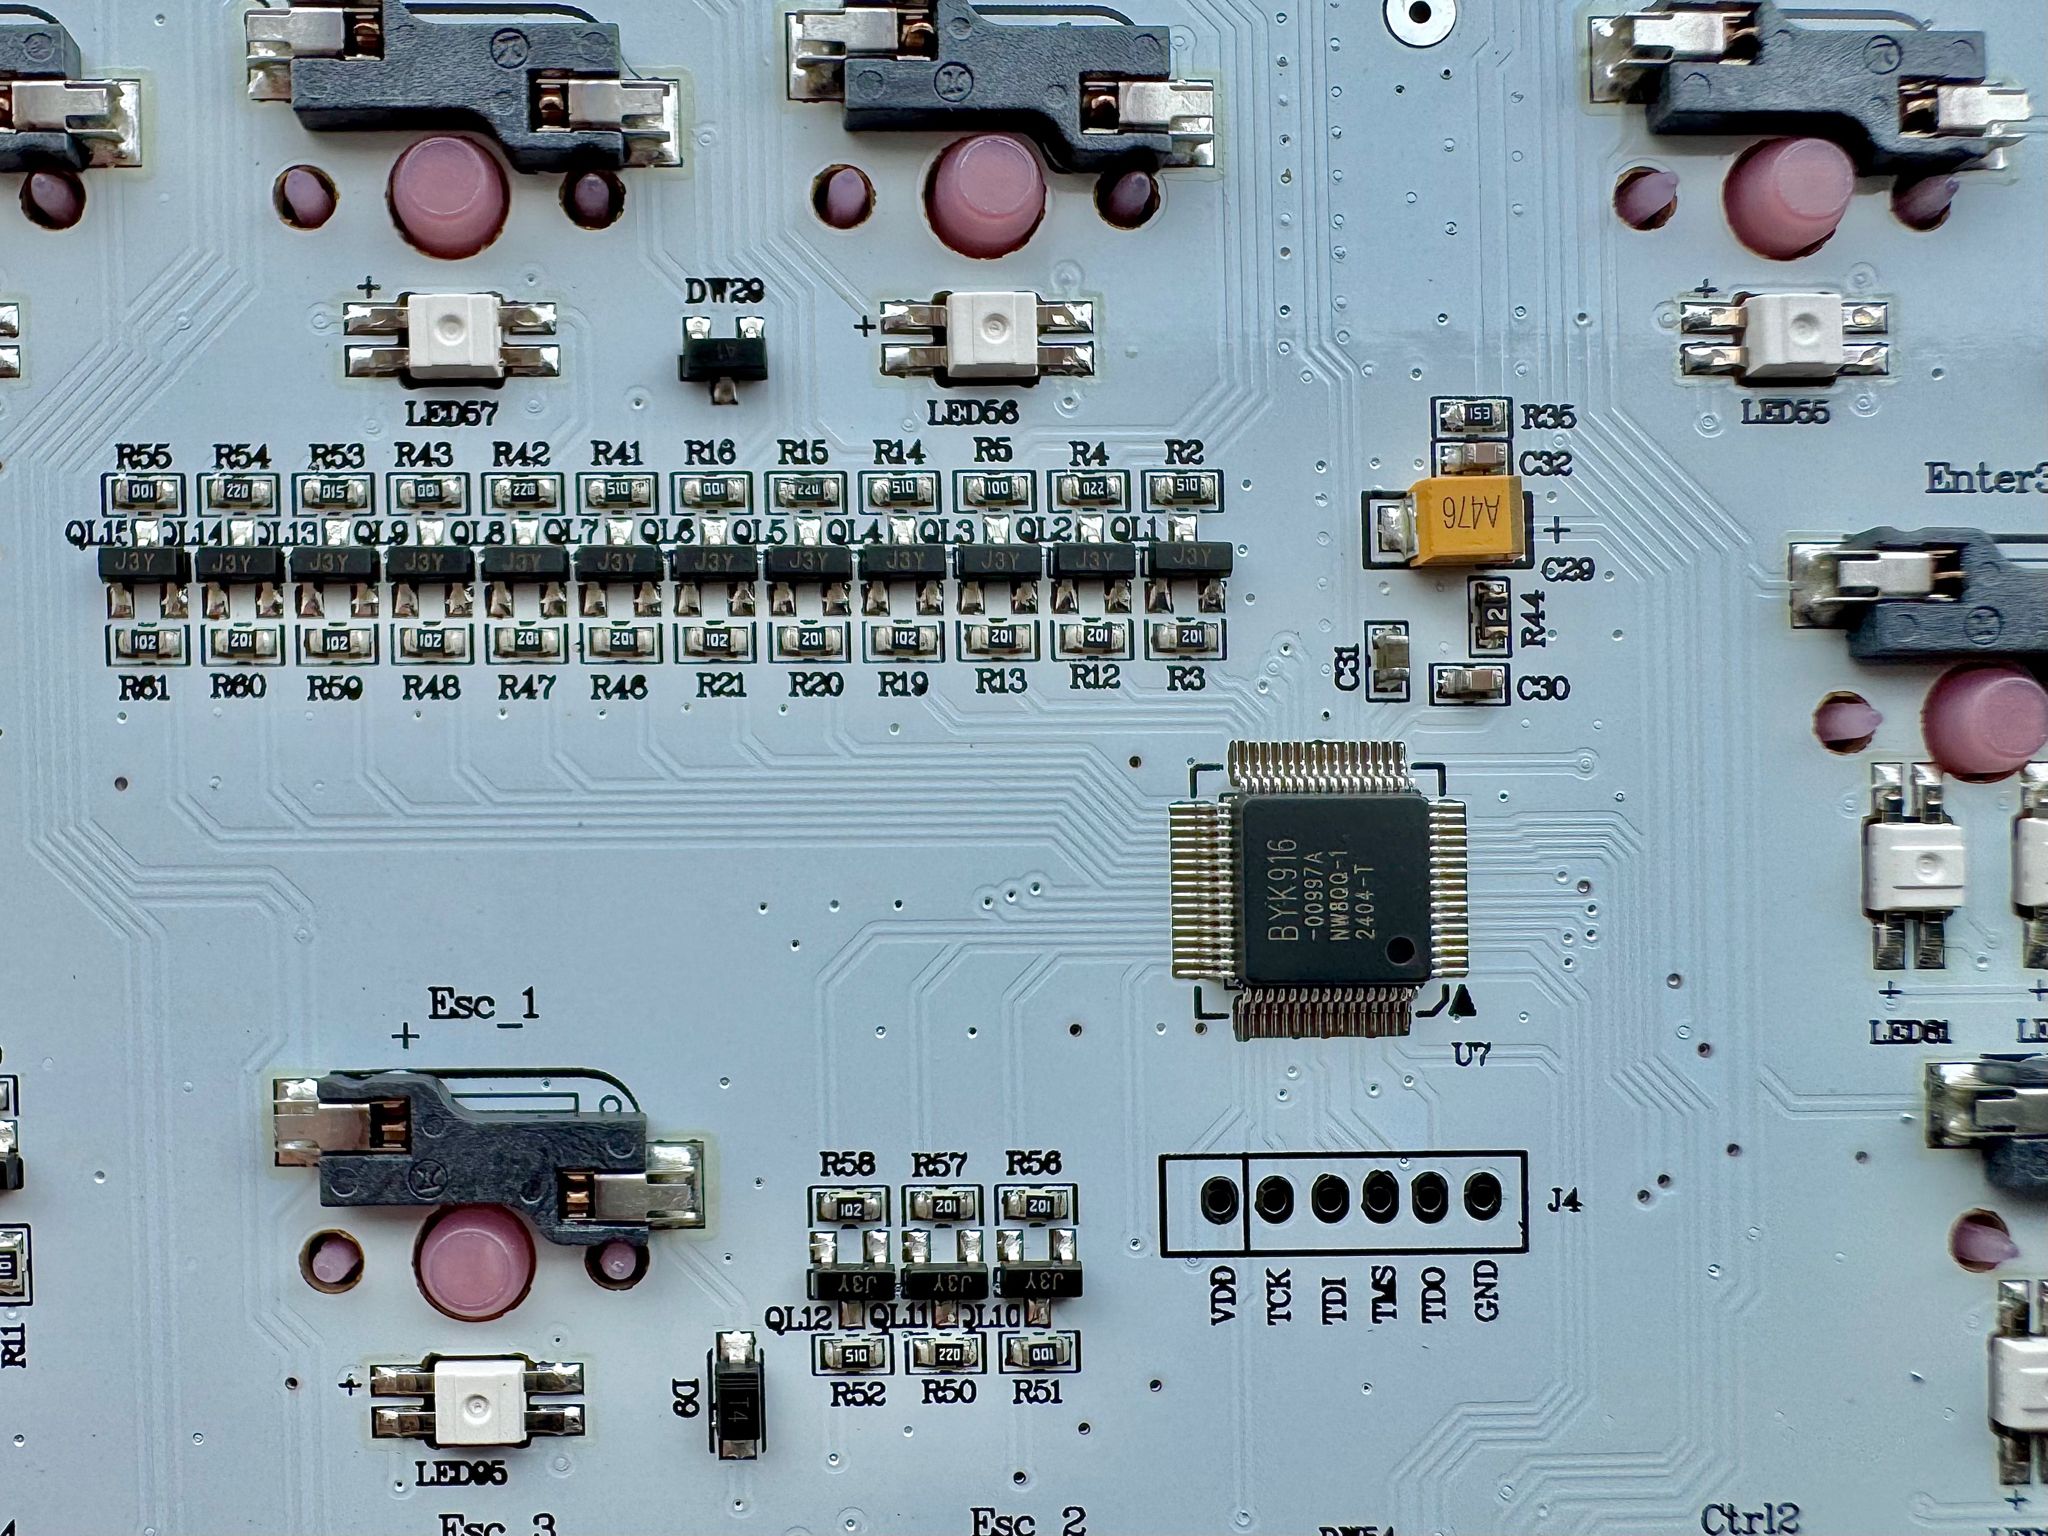
Most of what I’ve learnt about this chip comes from the hard work of this gentleman by the handle @carlossless, who also appears to be single-handedly propping up the open-source ecosystem for “obscure 8051 keyboard processors”. He has also reverse-engineered the programming process and published sinowealth-kb-tool, which is capable of dumping and flashing the firmware on these devices.
Blessed with the ability to read and write the firmware, I got to work by dumping and loading my keyboard’s firmware into Ghidra. Again, I have to mention that the 8051 is possibly an acquired taste, and I’m still at the gagging and retching part. Eventually, after a few iterations, I’ve managed to patch the firmware so that the RGB leds always remain off without interfering with the status leds (caps/num/scroll lock). This patched firmware can be downloaded here.
Sanity check before you begin: make sure your MD5 matches the one below, otherwise do not proceed any further.
sinowealth-kb-tool -r --vendor_id 0x258A --product_id 0x0049 --firmware_size 61440 --isp_index 1 original_fw.hex
INFO  [sinowealth_kb_tool::isp] Looking for vId:0x258a pId:0x0049
...
INFO  [sinowealth_kb_tool::isp] Regular device didn't come up...
INFO  [sinowealth_kb_tool::isp] Regular device not found. Trying ISP device...
INFO  [sinowealth_kb_tool::isp] Connected!
INFO  [sinowealth_kb_tool::isp] Enabling firmware...
INFO  [sinowealth_kb_tool::isp] Reading...
INFO  [sinowealth_kb_tool::isp] Rebooting...
INFO  [sinowealth_kb_tool] MD5: 3ffc61de3483dd7e11f2c1767b74add6
Write the firmware like this: sinowealth-kb-tool -w --part yinren-r108 noled.hex
I feel like if you’re going to flash a firmware blob from a complete stranger on the internet, it might be comforting to know what’s changed. Only these 3 lines spanning from addresses 0x2230 to 0x2260 are modified:
:10223000B41203022556E490FFE8F090FFE9F09015
:10224000FFEAF0743590FFD0F0743690FFD1F0744F
:102250003790FFD2F00225F8F583A3E0242690FF03
I’ve also briefly documented these artisanal, handwritten instructions. If it looks like a hack, you’d be right. But it works.
; current col index will be in A reg now
; if it isn't the status led col (0x12), then clear the PWM duty cycle manually
; and resume code execution past the original led pwm instructions so that the leds remain off.
; otherwise, resume at the original pwm instructions so that the status leds work properly

CODE:2230 b4 12 03        CJNE       A,#0x12, handle_nonstatus_leds
CODE:2233 02 25 56        LJMP       resume_led_drive_matrix_2556

handle_nonstatus_leds:
CODE:2236 e4              CLR        A

CODE:2237 90 ff e8        MOV        DPTR,#0xffe8
CODE:223A f0              MOVX       @DPTR=>DAT_EXTMEM_ffe8,A
CODE:223B 90 ff e9        MOV        DPTR,#0xffe9
CODE:223E f0              MOVX       @DPTR=>DAT_EXTMEM_ffe9,A
CODE:223F 90 ff ea        MOV        DPTR,#0xffea
CODE:2242 f0              MOVX       @DPTR=>DAT_EXTMEM_ffea,A

CODE:2243 74 35           MOV        A,#0x35
CODE:2245 90 ff d0        MOV        DPTR,#0xffd0
CODE:2248 f0              MOVX       @DPTR=>DAT_EXTMEM_ffd0,A
CODE:2249 74 36           MOV        A,#0x36
CODE:224B 90 ff d1        MOV        DPTR,#0xffd1
CODE:224E f0              MOVX       @DPTR=>DAT_EXTMEM_ffd1,A
CODE:224F 74 37           MOV        A,#0x37
CODE:2251 90 ff d2        MOV        DPTR,#0xffd2
CODE:2254 f0              MOVX       @DPTR=>DAT_EXTMEM_ffd2,A

CODE:2255 02 25 F8        LJMP       resume_led_skip_matrix_25f8
When done correctly, your keyboard should still work pretty much exactly like before, except the RGB LEDs should never come on. If you miss that feature again, simply flash the original firmware back onto the keyboard.
Bonus:
USB capacitance fix:

If you find that your USB hub briefly resets on startup/wake (and consequently brings down your audio and ethernet), consider removing at least one of the two chunky orange tantalum capacitors. USB 2.0 devices like this keyboard are not expected to present more than 10uF of capacitance to their host, yet these two caps already add up to ~100uF(!).
The bulk of the load on this keyboard should come from the LEDs, and guess what, we don’t use those anymore. Removing one cap was enough for my setup, though your mileage may vary.
If you want to do this with just a soldering iron, bridge both ends of the capacitor with a bit of copper from a scrap piece of wire. The heat should eventually melt the solder on both ends and the component can then be removed.
Blue LED replacement:
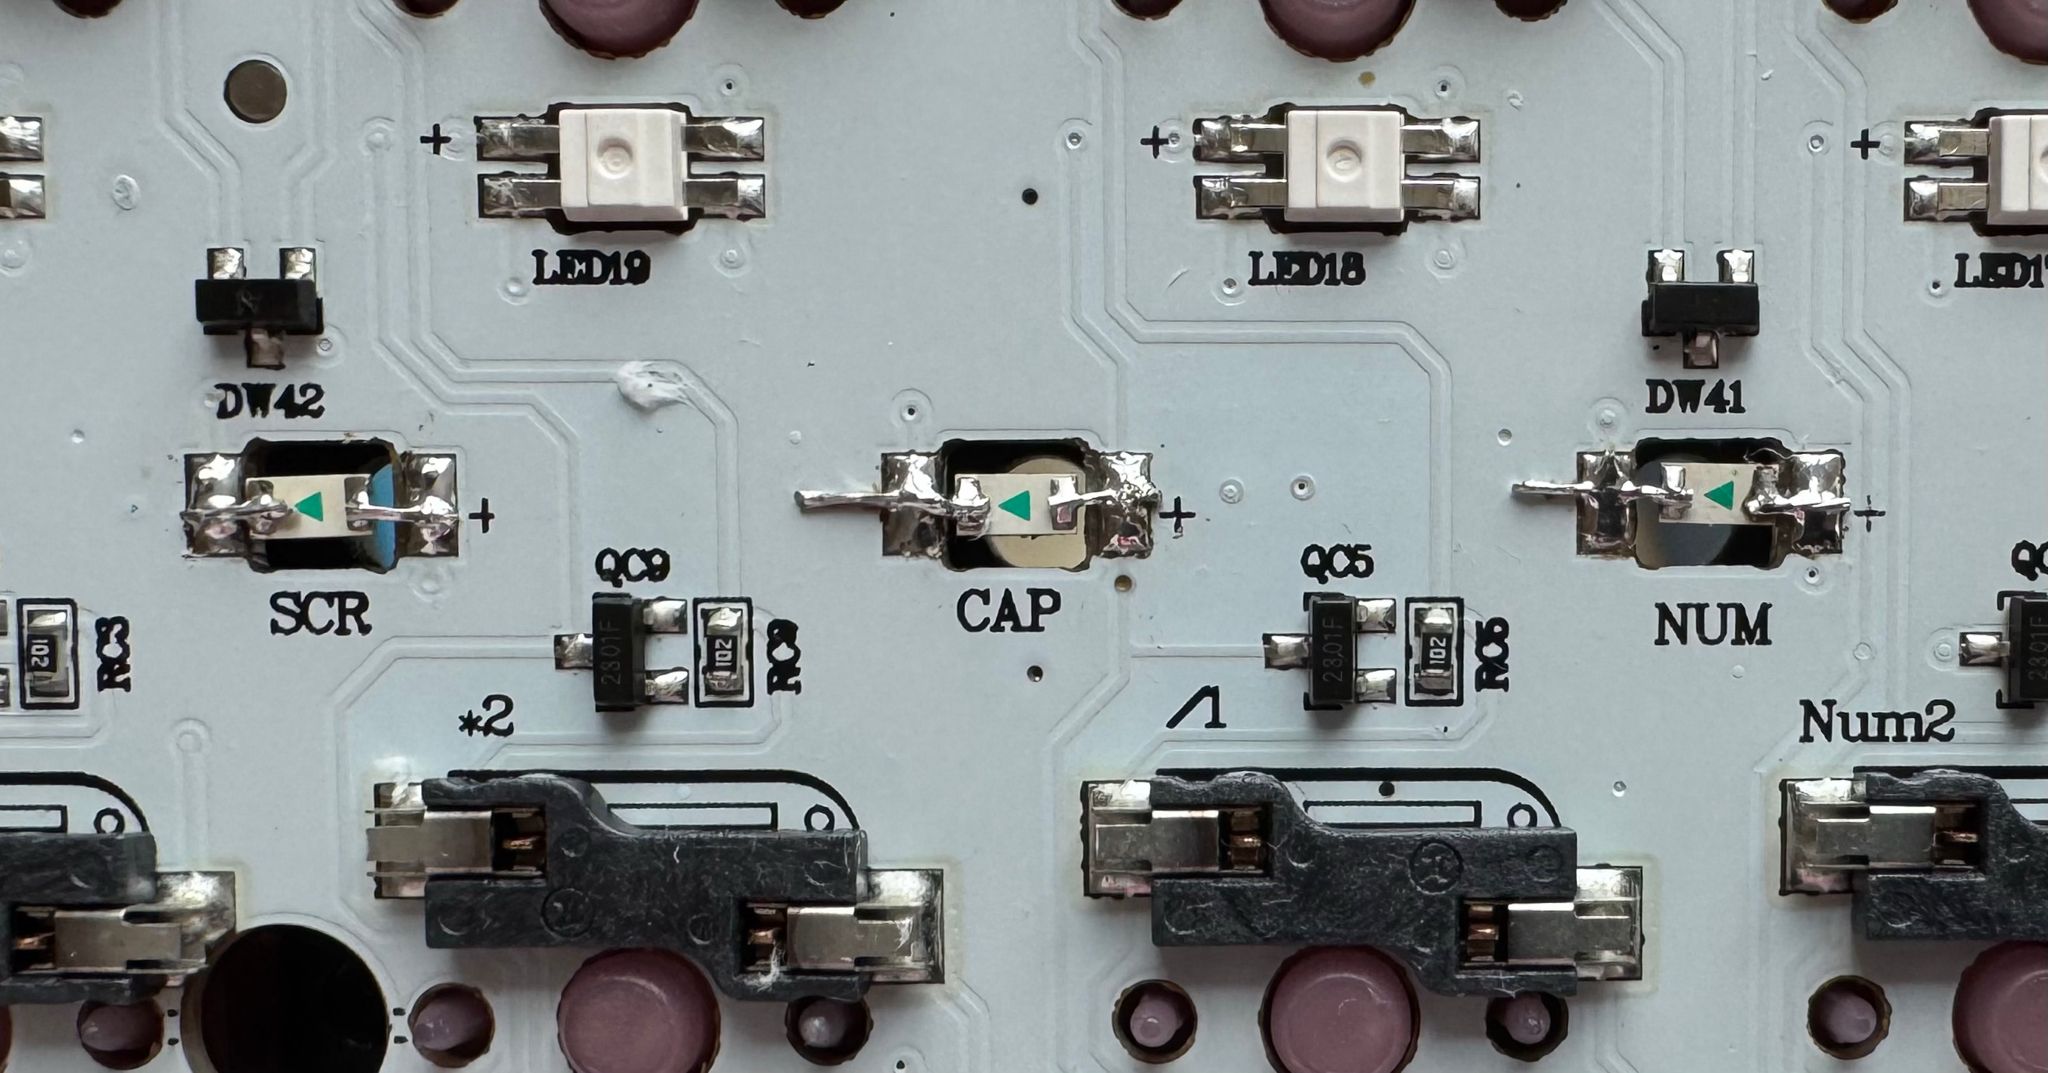
The original status indicator LEDs run on 470nm ultrabright blue LEDs, the harsh monochromatic sort that you would often find in “gaming routers”. They can be comfortably replaced by white indicator LEDs since most white LEDs are essentially the same blue LEDs with an extra layer of phosphor on top. You can see the results after the LED swap in the photo at the top of this post.
Enjoy your new and improved keyboard!