Getting started with the "Chinese" Proxmark3
Thu, Sep 20, 2018
Proxmark3 is an open-source RFID swiss-knife which can be used to sniff, duplicate and emulate different cards on both high frequency (13.56MHz) and low frequency (~125KHz).
The project consists of three significant parts:
- Client software running on a computer to handle heavier calculations, storage, and communicate with the device firmware
- Device firmware that runs on the AT91SAM7. Also includes a FPGA bitstream that is automatically uploaded.
- Hardware that typically includes the AT91SAM7, FPGA and RF frontend. Some variants contain connectors so that the antennas can be swapped.
Chinese Proxmark3 devices have sprung up at ~US$65, but there are some caveats for this incredibly low price which we will discover in a bit.
Buying Guide
“Proxmark3 Easy” is the most popular hardware variant on sale in Chinese markets. It integrates a HF antenna as part of the main PCB, and a separate LF antenna is connected via brass standoffs. A “battery shield” option is also available to operate the device in a standalone mode, powered by a 600mAh Li-Po battery.
Flash Memory
Many devices ship with the AT91SAM7S256 as a cost saving measure (caveat), which works just as well as its bigger brother AT91SAM7S512. As the firmware size is approaching 256KB, it may be advisable to purchase a board with the AT91SAM7S512, especially the 512KB option only costs a few dollars more.
JTAG
Some firmware flashing will usually be performed to get the best out of the Proxmark3. This process can be tricky especially when upgrading across major versions, and bricking the Proxmark3 is a common occurrence. A suitable JTAG utility that can externally flash the AT91SAM7, such as the OpenOCD, BMP or J-Link will make these process much less stressful.
The J-Link EDU can be purchased from Adafruit for $20.
Duplication Cards
Chances are that the Proxmark3 will be used to duplicate RFID cards. The two cards that cover most use cases are the “T5577” for low frequency cards such as HID / EM4100, and “UID changeable” high frequency cards for MIFARE 1K. These cards are not interchangeable, and they usually go for less than US$2.
A special card that covers both frequencies is also available, combining both T5577 and UID-writable 1K chips onto a single card. These cards are preferable for their flexibility especially since they do not cost much more. Search for “Dual Frequency T5577” at your favourite Chinese marketplace to find them.
Firmware & Client
Proxmark3 device firmware and client versions must match to work properly. Mismatches will cause commands like hw tune to return invalid results:
# LF antenna:  0.00 V @   125.00 kHz
# LF antenna:  0.00 V @   134.00 kHz
# LF optimal:  0.00 V @ 12000.00 kHz
# HF antenna:  0.00 V @    13.56 MHz
# Your LF antenna is unusable.
# Your HF antenna is unusable.
My Proxmark3 was purchased as a kit from Aliexpress from “Piswords”. It was shipped with a unknown firmware (“Modify by Willok(willok@163.com) from Taobao”)
After some trial and error, the firmware appears to work best with a v2.3 client. A dump of the original firmware is available here if you wish to use their tools instead.
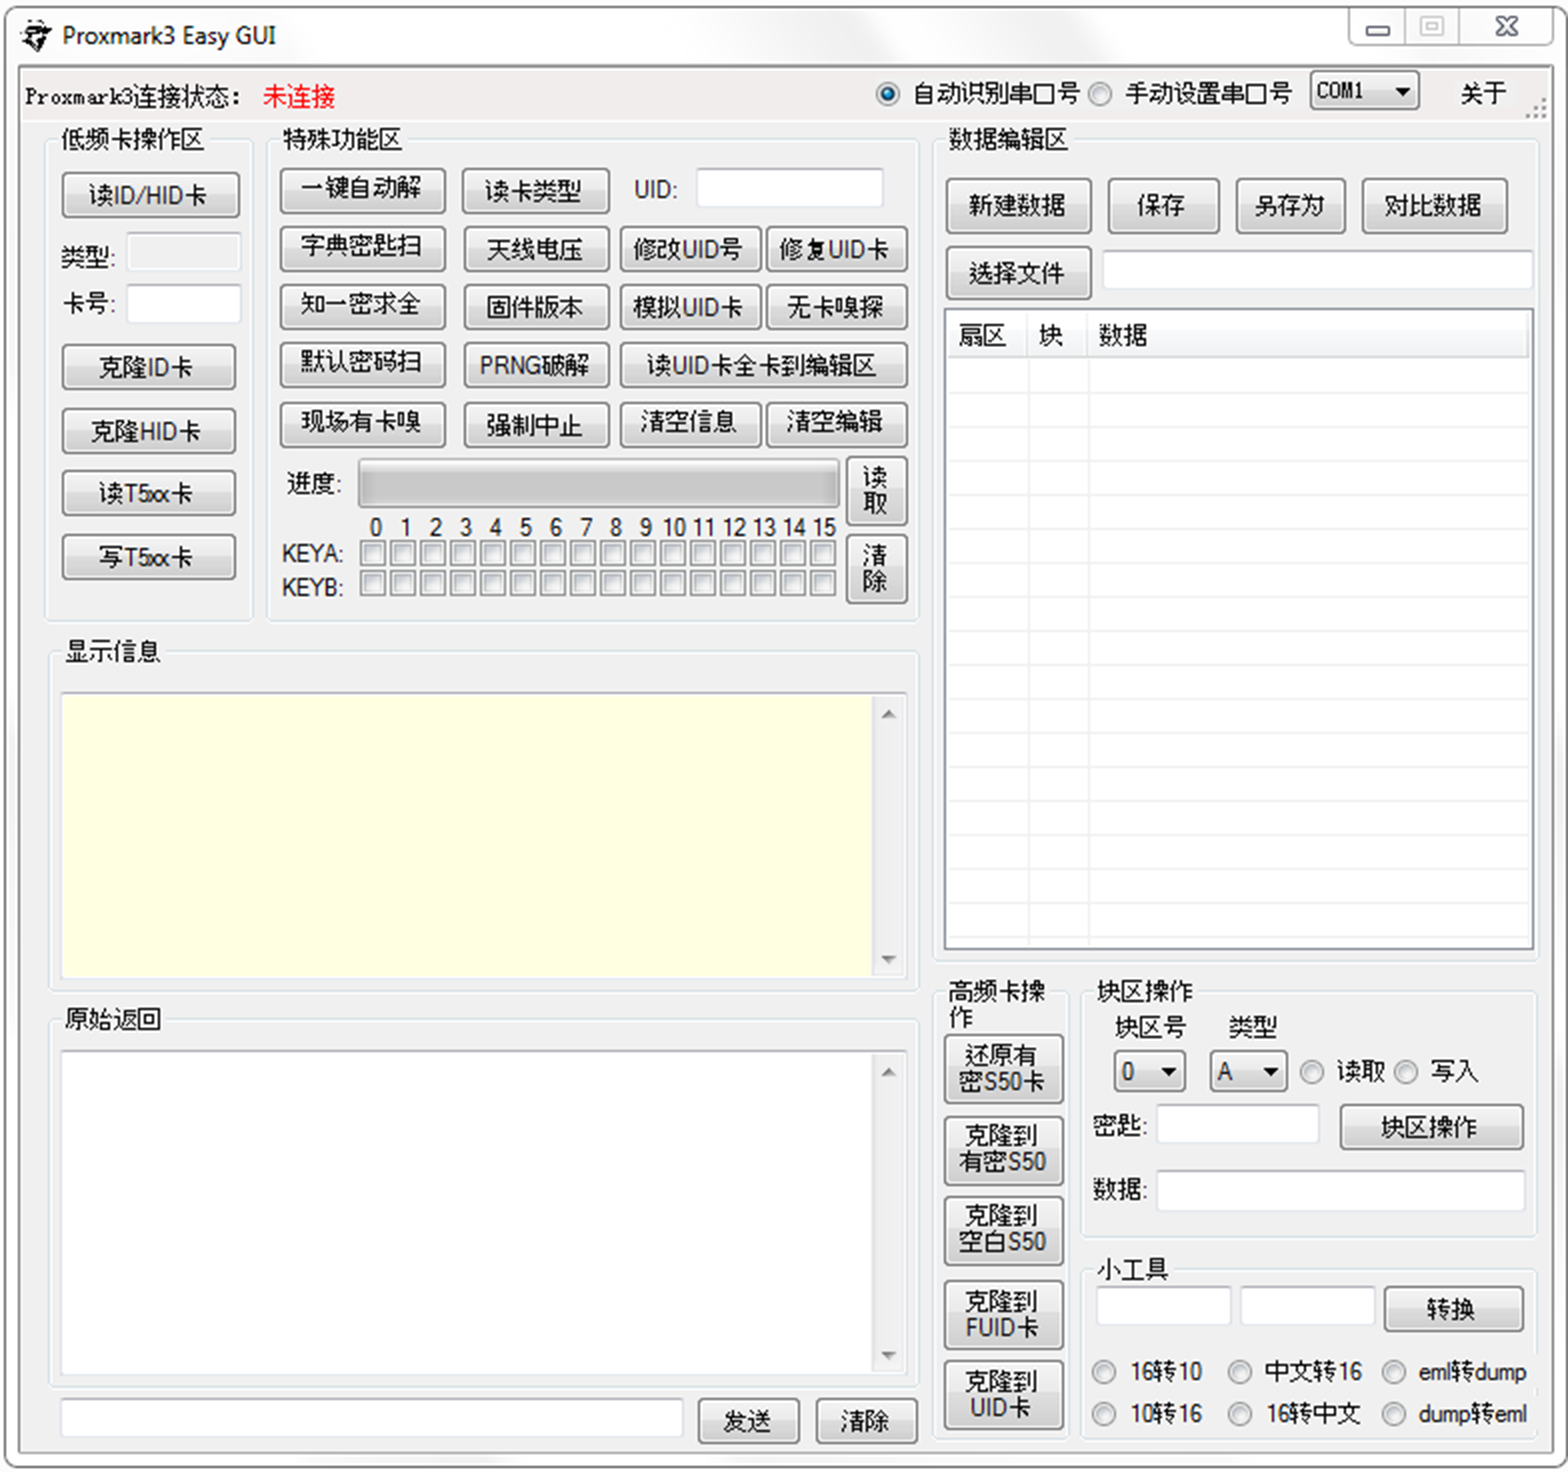
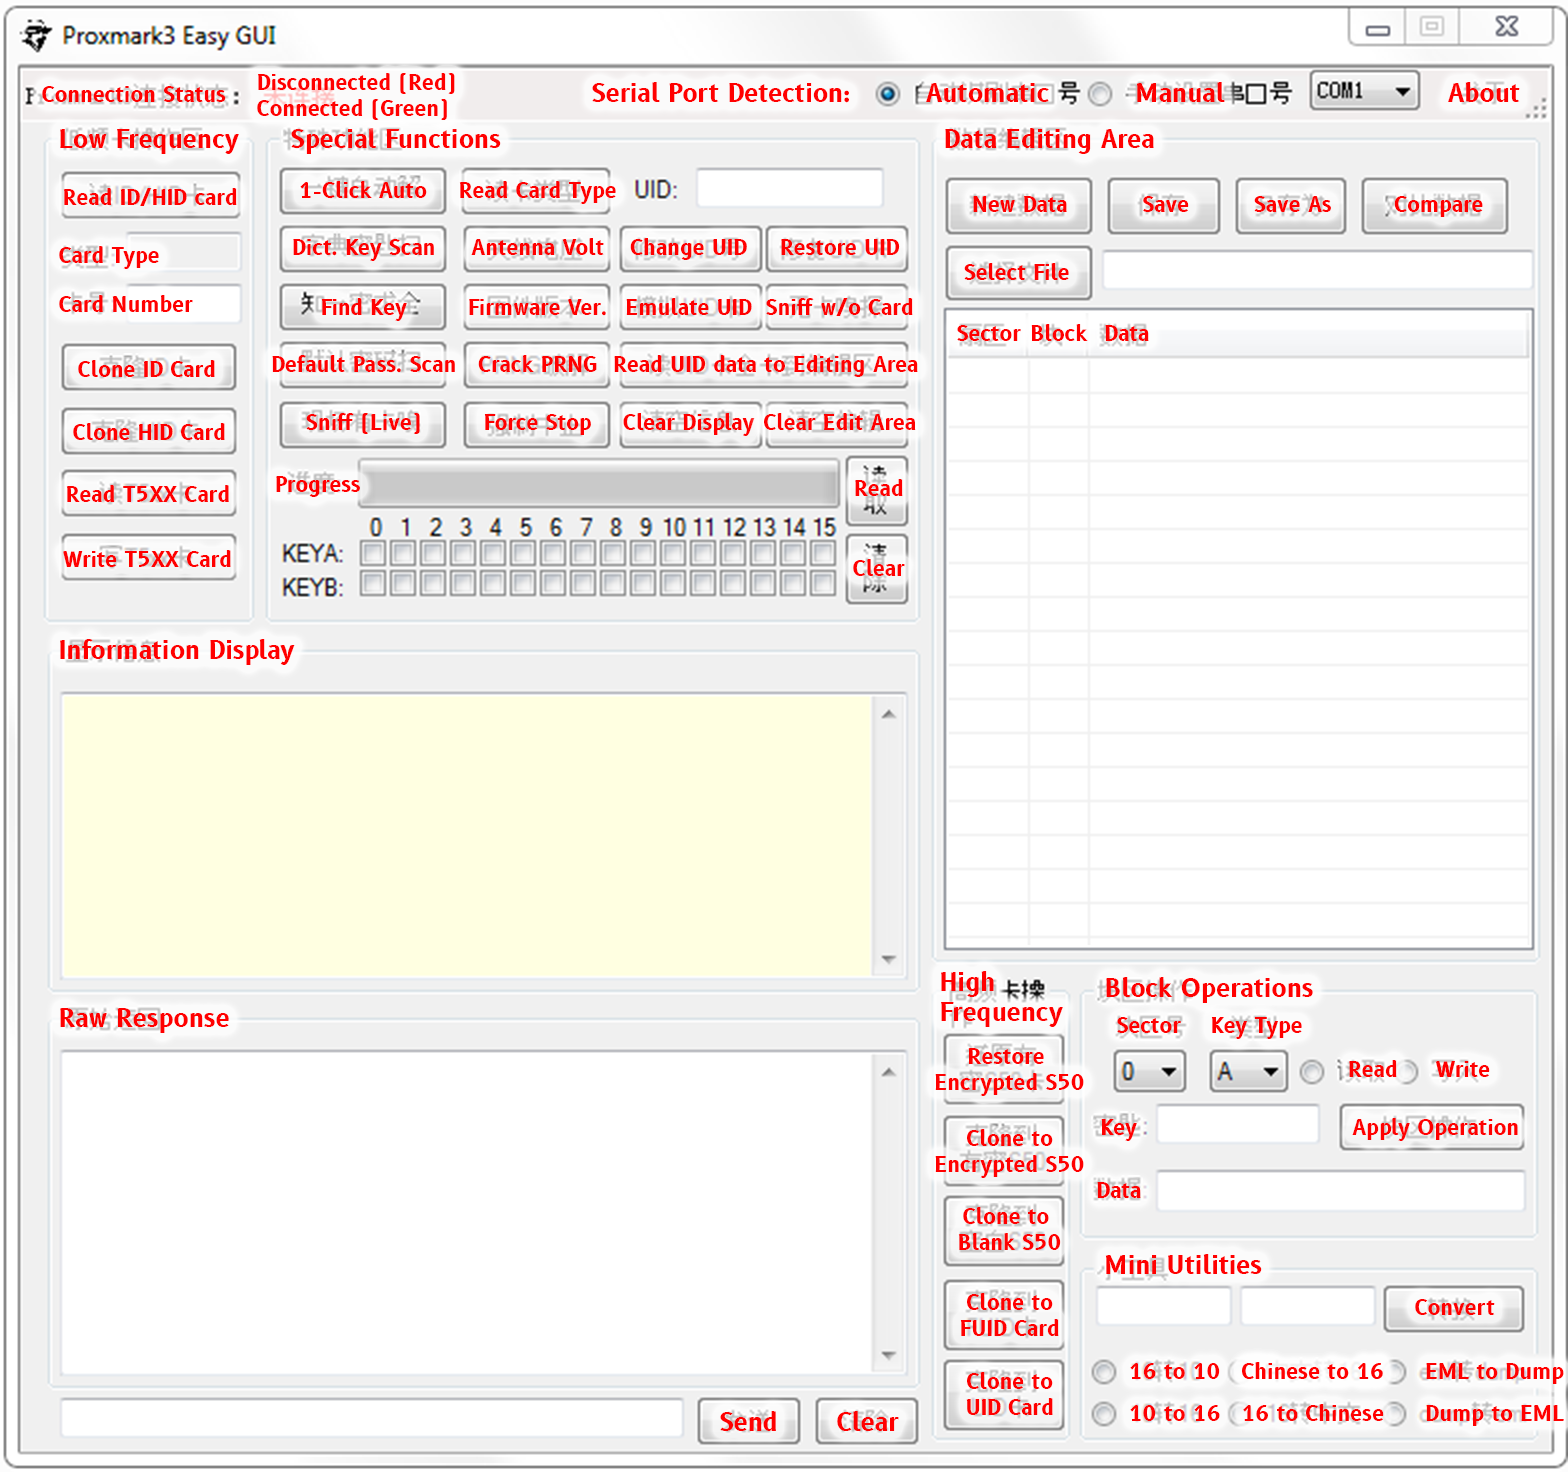
The vendor also provided a very interesting GUI client which is only available in Chinese (another caveat). As it unarchives its own copy of proxmark3.exe, the GUI will not work with more recent firmware versions.

For the adventurous, I have also translated the GUI application. I strongly recommend sticking to the Proxmark3 console as it has much more features and is easier to learn than the Chinese language =P

Setting up
When your Proxmark3 arrives, you can choose to stick to their modified fork, or flash a more recent version of Proxmark3 onto your device. The hardware for “Proxmark3 Easy” is directly compatible with official builds without modification.
Forks
“Chinese” fork
This is what you get out of the box. If you are keen on using the provided clients, GUI and firmware, no flashing will be required. As it is based on pre-3.0 sources, there will be some core features missing such as hardnested MIFARE attacks. The device will show up with a Vendor ID of 2D2D and Product ID of 504D.
Official Proxmark3
The official 3.0.1 Proxmark3 appears to work perfectly fine (in my experience). Some hiccups may occur during the upgrade as the device’s VID/PID will change to 9AC4/4B8F.
The official download thread lead to a bunch of dead Sendspace links. Working links can be found here instead.
Iceman’s Fork
Iceman’s fork is the bleeding edge Proxmark3 build, with the most features and potentially more bugs. The files can be found in the same link, and the flashing process should be identical to the official branch.
JTAG
Should the device get bricked during the flashing process, simply connect it with a JTAG flasher of your preference and flash /recovery/proxmark3_recovery.bin to 0x100000. I personally find the JTAG process to be very consistent and not much harder than using the flasher.exe binary, which does not work well across major versions.
Windows Drivers
On Windows 8 and above, drivers should be automatically installed. For Windows 7, connect your Proxmark3 and point device manager to search the /drivers/ folder when it shows up as an “Unknown Device”. When successfully installed, the Proxmark3 should show up in Device Manager with a port number like COM1.
Testing
Open a command window in the /proxmark3/client folder and run proxmark3 COM1, replacing COM1 with your device’s port. A welcome banner should appear with a prompt. Run the hw tune command, and if there are no messages containing “antenna is unusable”, then the device is ready!
Common Operations
Low Frequency: HID
Search for low frequency cards
lf search
… HID Prox TAG ID: 20050111e6 (35059) - Format Len: 26 bits - FC: 128 - Card: 35059 Parity: valid
Valid HID Prox ID Found!
Clone HID card onto T5577
lf hid clone 20050111e6
Cloning tag with ID 20050111e6
High Frequency: MIFARE 1K
Search for high frequency cards
hf search
Valid ISO14443A Tag Found - Quiting Search
Check for default keys - at least 1 needed for nested attack
hf mf mifare
… Found valid key:a0a1a2a3a4a5
Perform nested attack with at least one known key, dumping keys to a file
hf mf nested (card memory size) (block) (key A/B) (key) (dump flag - d)
hf mf nested 1 0 a a0a1a2a3a4a5 d
|---|----------------|---|----------------|---|
|sec|key A           |res|key B           |res|
|---|----------------|---|----------------|---|
|000|  a0a1a2a3a4a5  | 1 |  b0b1b2b3b4b5  | 1 |
|001|  cafecafecafe  | 1 |  b0b1b2b3b4b5  | 1 |
|002|  a0a1a2a3a4a5  | 1 |  b0b1b2b3b4b5  | 1 |
|003|  a0a1a2a3a4a5  | 1 |  b0b1b2b3b4b5  | 1 |
|004|  a0a1a2a3a4a5  | 1 |  b0b1b2b3b4b5  | 1 |
|005|  a0a1a2a3a4a5  | 1 |  b0b1b2b3b4b5  | 1 |
|006|  a0a1a2a3a4a5  | 1 |  b0b1b2b3b4b5  | 1 |
|007|  a0a1a2a3a4a5  | 1 |  b0b1b2b3b4b5  | 1 |
|008|  a0a1a2a3a4a5  | 1 |  b0b1b2b3b4b5  | 1 |
|009|  a0a1a2a3a4a5  | 1 |  b0b1b2b3b4b5  | 1 |
|010|  a0a1a2a3a4a5  | 1 |  b0b1b2b3b4b5  | 1 |
|011|  a0a1a2a3a4a5  | 1 |  b0b1b2b3b4b5  | 1 |
|012|  a0a1a2a3a4a5  | 1 |  b0b1b2b3b4b5  | 1 |
|013|  a0a1a2a3a4a5  | 1 |  b0b1b2b3b4b5  | 1 |
|014|  a0a1a2a3a4a5  | 1 |  b0b1b2b3b4b5  | 1 |
|015|  a0a1a2a3a4a5  | 1 |  b0b1b2b3b4b5  | 1 |
|---|----------------|---|----------------|---|
Use previously dumped keys to dump entire card contents
hf mf dump 1
.. Dumped 64 blocks (1024 bytes) to file dumpdata.bin
Restore entire card content (excluding UID) to another card
hf mf restore 1
Use UID writable backdoor to write manufacturer data
hf mf csetuid cafe0102 0004 08
Bonus: Pre-built LF Standalone firmware
This firmware is built using the latest official PM3 branch as of writing, and is designed for “red team” use. I have modified the already good HID standalone code by @samykamkar to simplify the cloning process when used in the field.
USAGE
The description is generic as different devices may have different LED placements, labels or colors.
- Turn on the Proxmark3 and wait for LEDs to stabilize (~2 seconds)
- Press and hold the button until the LEDs “dance”. Wait for it to stabilize (~2s). The device is now able to capture a HID card.
- When a HID card is brought sufficiently close, an LED will toggle to indicate that the card is captured.
- Place a T5577 card onto the device and press the button once. When the LEDs stabilize, the captured card has been successfully copied onto the T5577.
The T5577 cloning process can be repeated by pressing the button. Once a HID card is captured, it will remain in the RAM until the device is powered off to prevent accidental overwrites.
Thanks for reading through! I hope you’ll have fun with the Proxmark3 ^^
Notes
Flashing
Backing up the original vendor’s firmware before flashing with official firmware for AT91SAM7S256 (J-Link Commander)
Change 0x40000 to 0x80000 for AT91SAM7S512
h
savebin proxmark3_recovery.bin 0x100000 0x40000
Writing a new firmware (J-Link Commander)
h
loadbin "C:\\path_to_recovery_image\\proxmark3_recovery.bin" 0x100000
Bear in mind that these are .bin, not .elf images.
“GUI” safety
The vendor’s Chinese client drops a bunch of files and runs as a obfuscated .NET binary, but otherwise appears benign.